How to use Cyclam
An app for shift workers that brings together your shift calendar, wake-up alarms, and paid leave and overtime records.
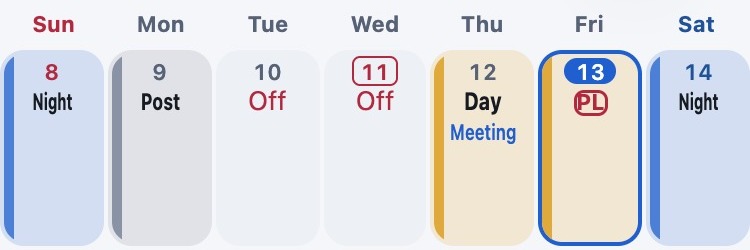
Calendar
Alarms (PRO)
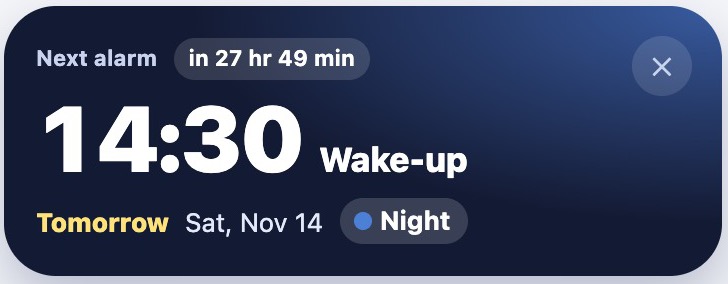
Enter your shifts, and alarms are set automatically to match them
This is a translation of the Japanese original. If there is any difference, the Japanese version prevails.
1. Getting started
What it does
- Enter shifts: Enter a fixed rotation like “Day, Day, Night, Post, Off, Off” for as many months as you like, all at once.
- Alarms are set automatically: Alarms for waking up and for leaving home are set to match your shifts.App onlyPRO
- Count your paid leave: Leave you add to the calendar is subtracted, and the balance is shown. Half days and hourly paid leave (hourly leave) are supported too.
- See your overtime at a glance: Extra time from early starts and overtime is shown for each day and as a monthly total.
- Keep a photo of your paper roster: Keep photos of the monthly roster and the annual holiday calendar you get at work.PRO
- Connect to your phone's calendar and home screen: Put your shifts in your phone's calendar, or see them in a home screen widget.App only
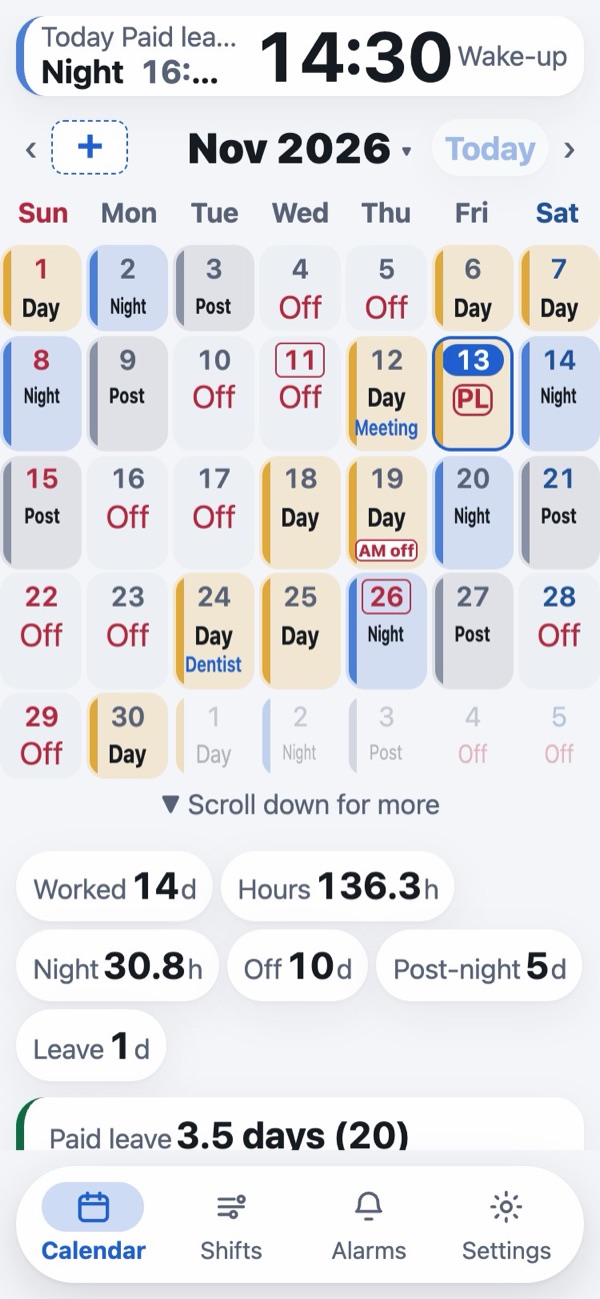
Switch screens with the tabs at the bottom.
| Calendar | See your shifts. Tap a date to change that day's shift, leave or hours. |
|---|---|
| Shifts | Create shift types. Stations and breaks. Enter shifts in bulk. Connect to your phone's calendar. Send to others. |
| Alarms App only | Check the alarms that are set. Any missing permissions show up here. |
| Settings | From the top: Display, Leave, Shown below the calendar, and Other (backup and more). |
Tap i on a screen to open a short explanation right there (tap again to close it). You'll find it next to Cutoff day, Hourly leave, Grant date, Stations and breaks, Build rotation, Alarm sound, Nap slots and Day off (scheduled).
What appears in the calendar cells
- Shift name: The thin line on the left and the cell color are the shift's color.
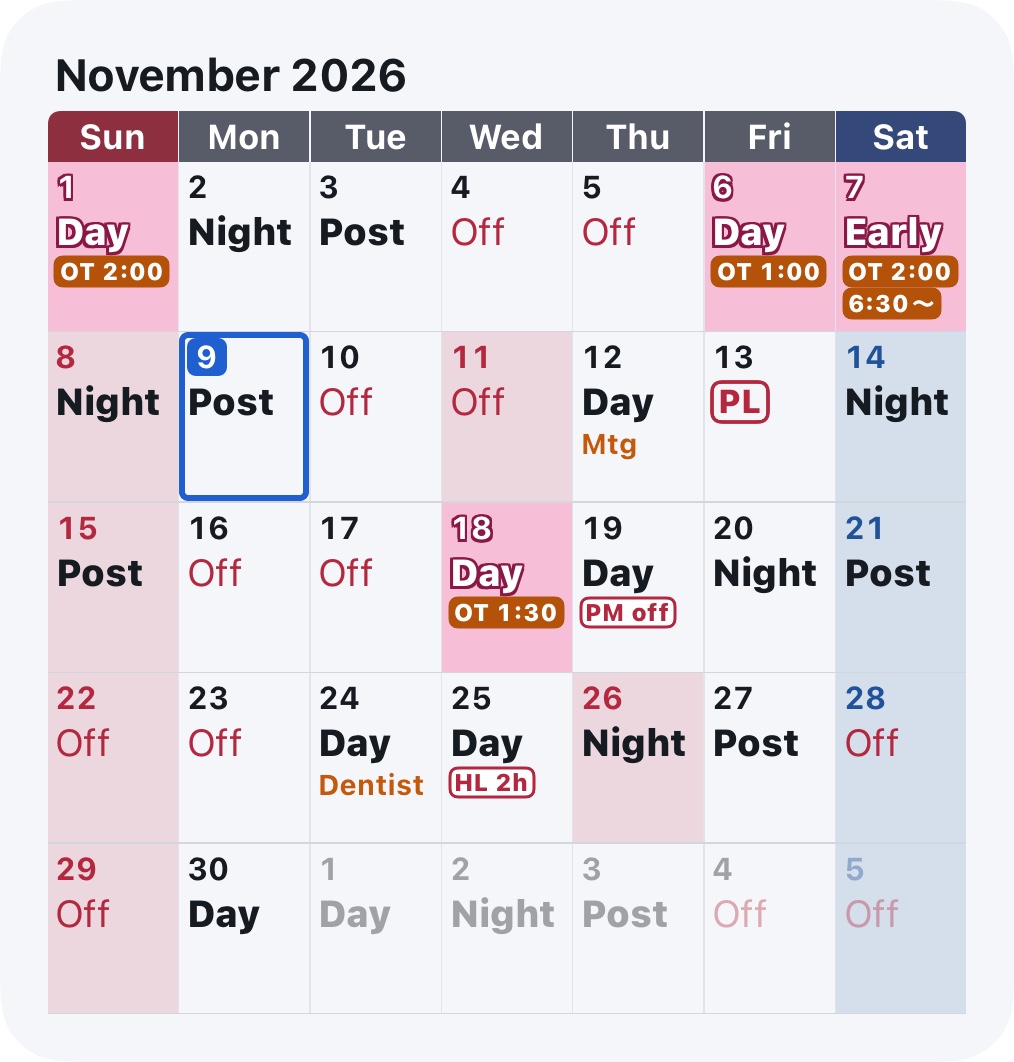
- Red text, red frame: Leave. A full day of leave shows “PL” (or the leave name) instead of the shift name, a half day shows “AM off”, and hourly leave shows “HL 2h”.
- Orange frame: An early start, like “from 6:30”, or overtime, like “OT 2:00”.
- Blue text: The “Note” you wrote for that day (as much as fits in the cell, up to 3 lines).
- “½ Off” in a red frame: A day with a shift where you work half the day and the other half is a day off (see Half day off).
- Red square around the date: A public holiday in your region (you can choose the region in Settings > “Display” > “Holidays”).
- Colored dot and number at the bottom right: Your station (only if you use Stations and breaks).
- Colored letter at the bottom left (E, L, etc.): That night's nap slot (only if you use night nap times by day).
You can change how these look in Settings > “Display” > “Advanced display settings”, under “How shifts and days off look” and “Cell marks and colors” (see How shifts and days off look, cell marks and colors).
What's free and what's PRO
The app is free to install. PRO features include “auto alarms”, so you don't have to set your alarms again every night.
| Feature | Free | PRO |
|---|---|---|
| Alarms | Add by hand (1 week) | Set automatically |
| Alarm sound | Standard | Custom |
| Paid leave left | Total | Breakdown too |
| Add leave types | — | ✓ |
| Widgets | — | ✓ |
| Roster photo | — | ✓ |
| Shifts, monthly summary, overtime, hourly leave, important days, stations, calendar connection, sending, backup | ✓ | ✓ |
- 30-day free trial: When you first enter shifts, Try free for 30 days appears. For 30 days from the day you tap it, you can use all PRO features (if you started the trial in an earlier version, it stays at 60 days). You can also start it later from the top of Settings.
- You won't be charged when the trial ends: Nothing is paid automatically. The app and a notification let you know before it ends.
- After it ends: Alarms are no longer set automatically. Alarms you added yourself still ring. Your records are not deleted (leave types you added and roster photos come back when you get PRO).
- Get PRO: Open the purchase screen from the top of Settings. Pay once and use it for good. There is no monthly fee.
- New phone or reinstall: With the same store account, tap Bought before? Restore purchase on the purchase screen to get it back without paying again. If you were given a code, tap Have a code? instead.
The App only mark means the feature works only in the iPhone and Android apps. It doesn't work in the web version you open in a browser. The PRO mark means the feature works with PRO (or during the trial).
2. Create your shift types
First, add the shifts you use at work. Choose a common shift template to create them all at once.
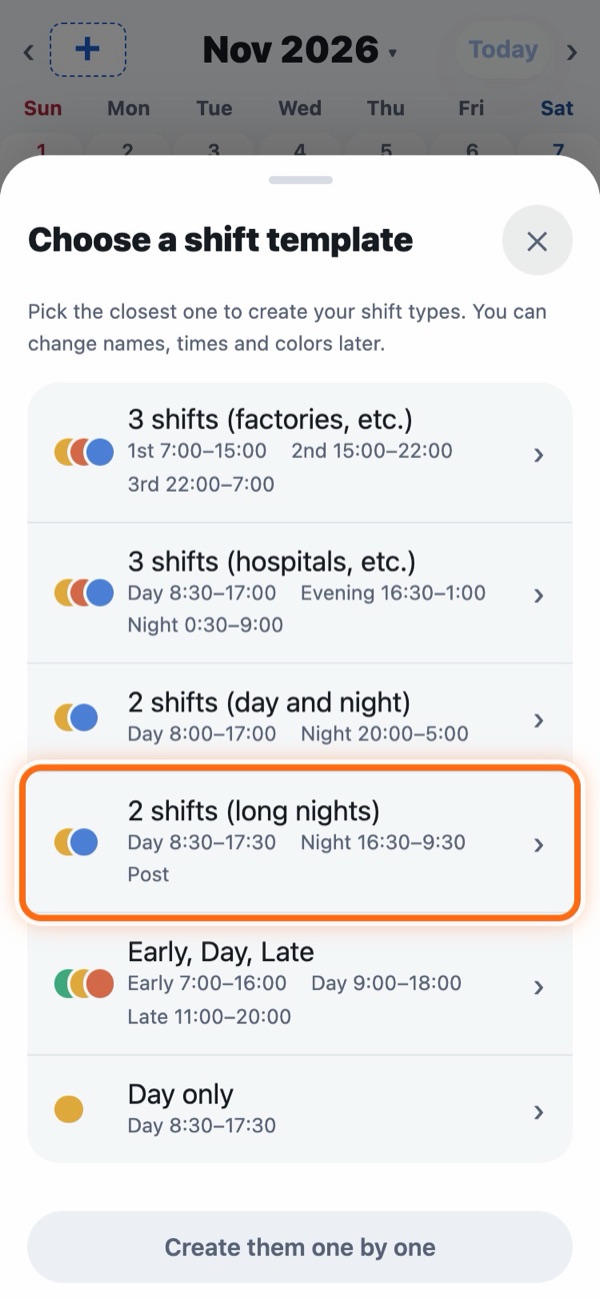
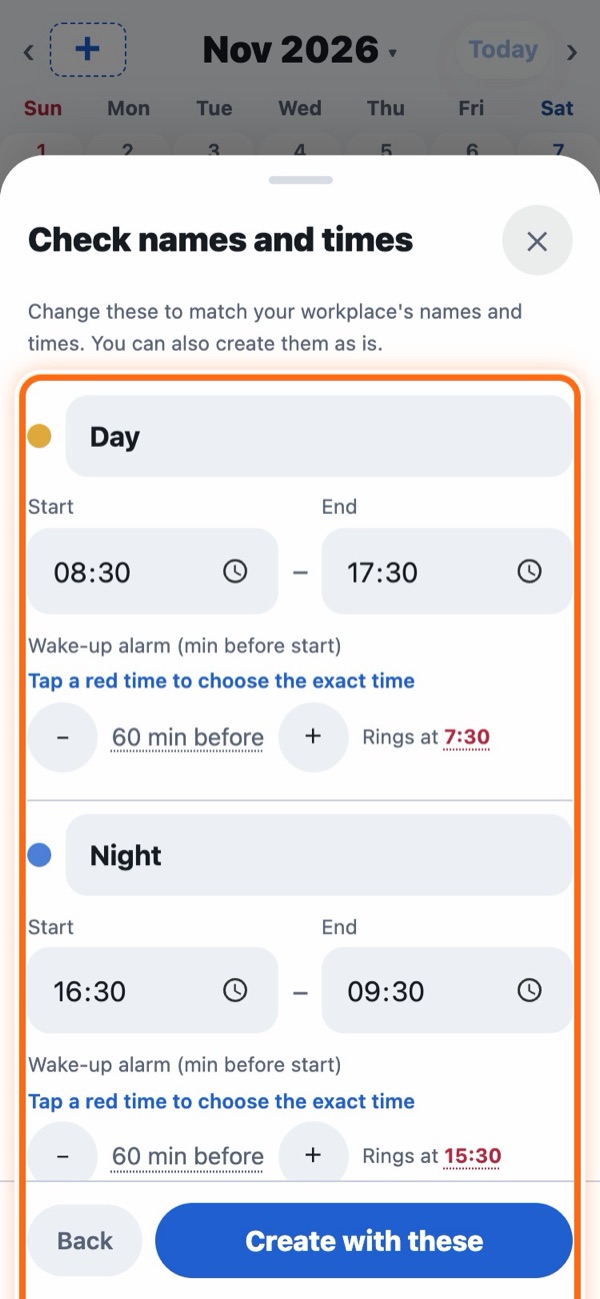
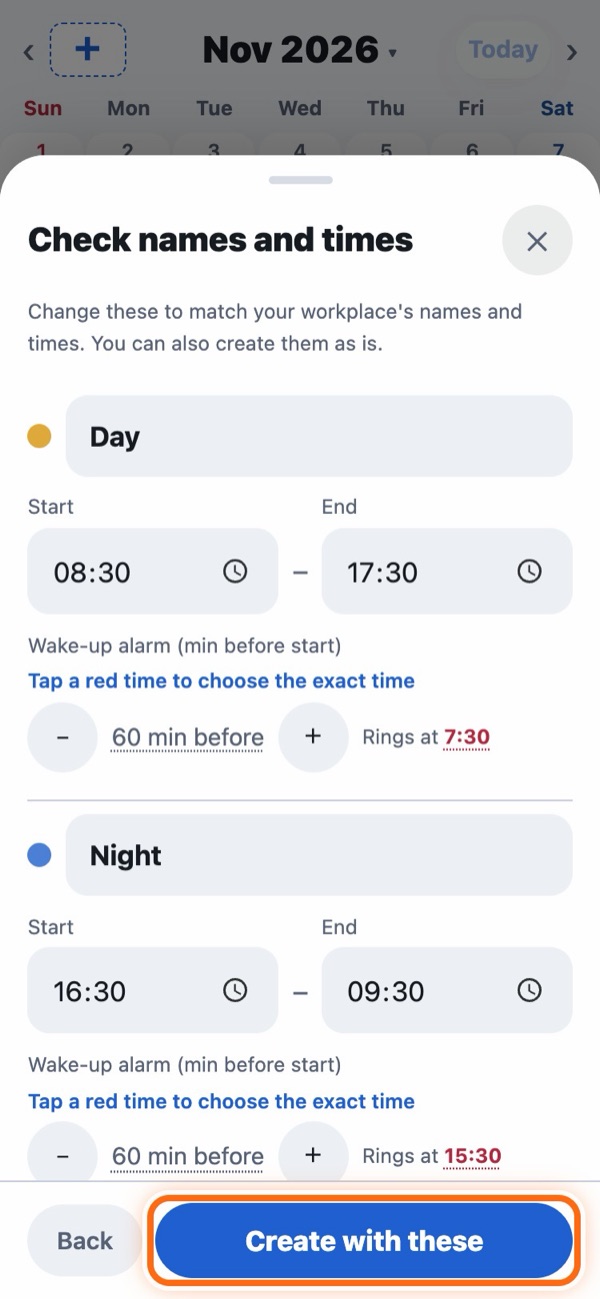
- The first time you open the app, this appears after you tap Get started on the intro. Later, you can open it with Choose from shift templates on the calendar.
- Set your wake-up time as “minutes before start”. Tap + and − to see the actual time.
- After you create them, “Build rotation” opens, so you can go straight on to entering shifts (see Enter by rotation).
Add or change shifts later
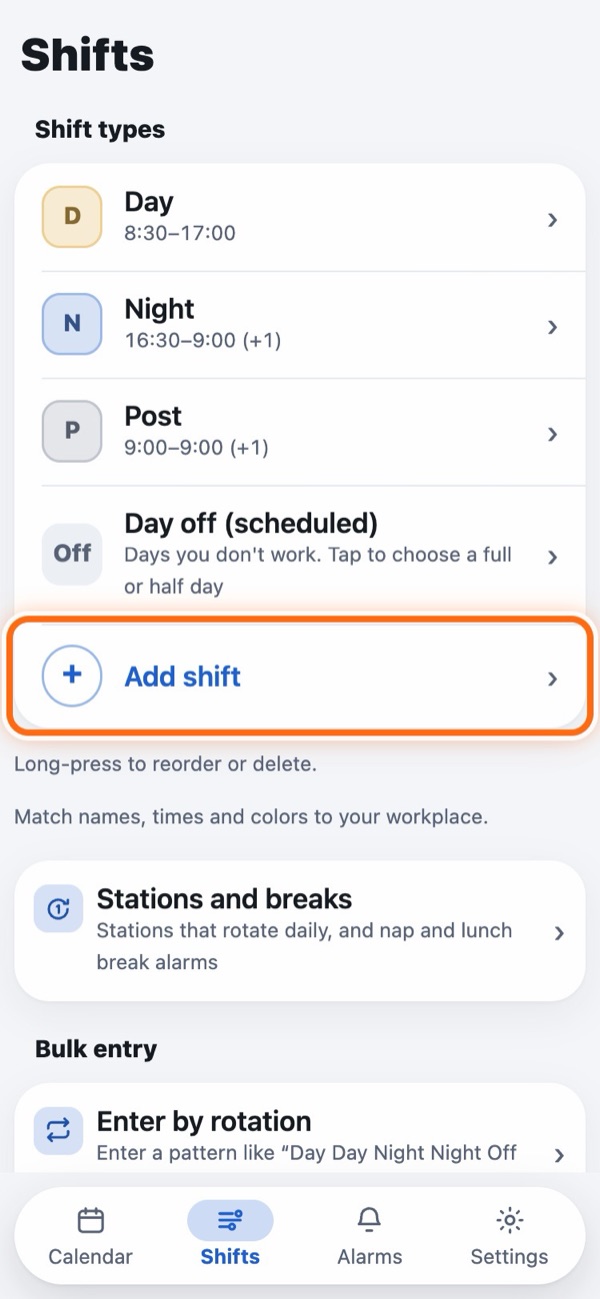
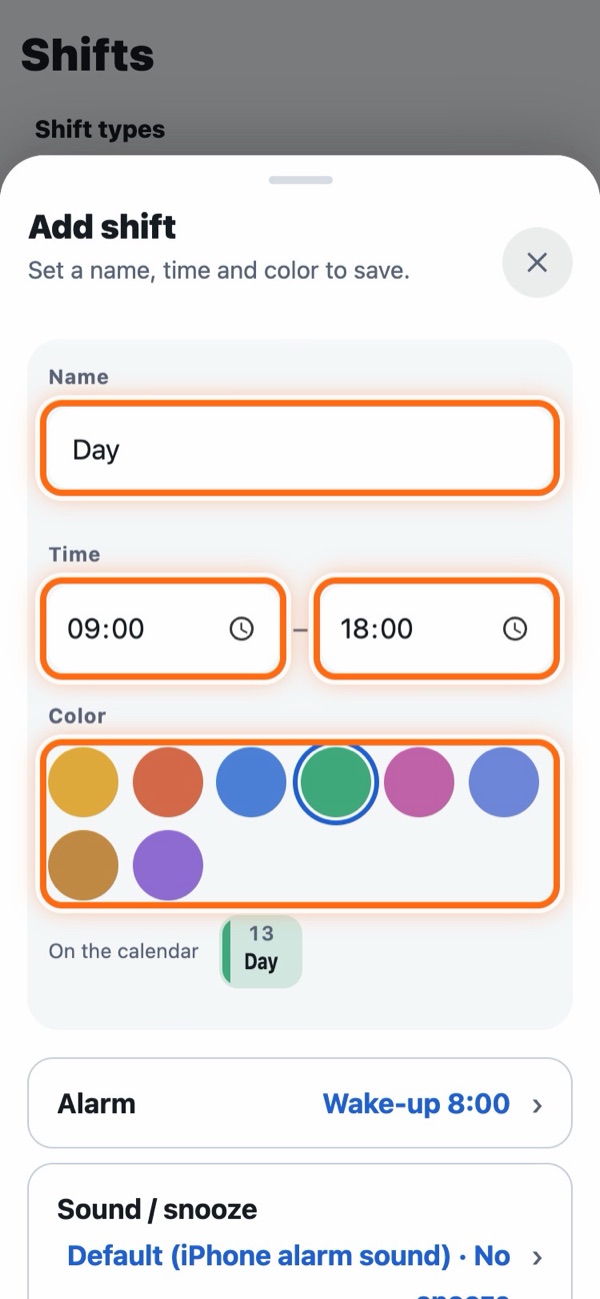
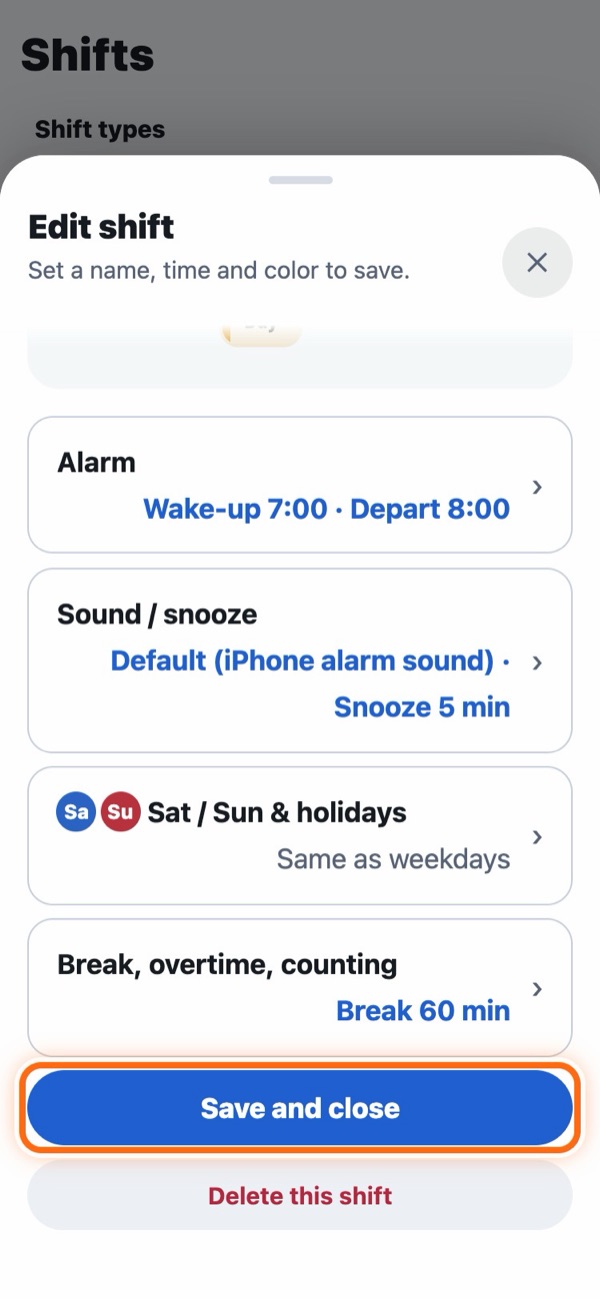
- To change a shift, tap it in the list.
- Rows such as Alarm, Sound / snooze, Sat / Sun & holidays and Break open when you tap them. The current settings are shown on the right (see Alarms).
- Closing with ✕ at the top right also saves.
Good to know
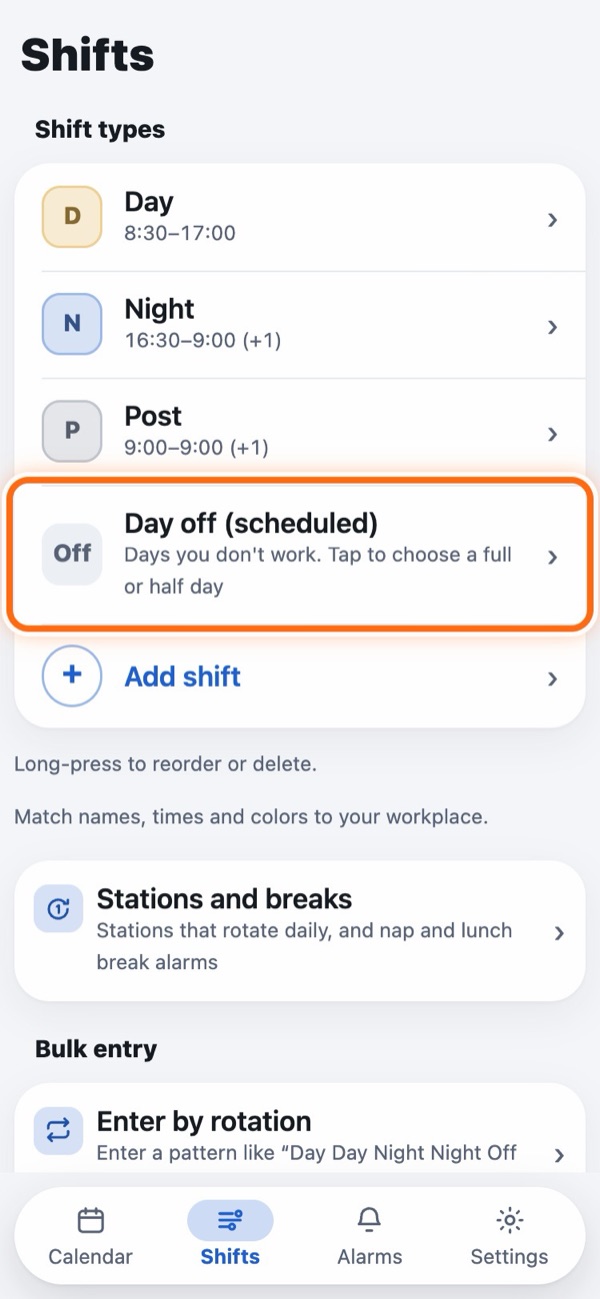
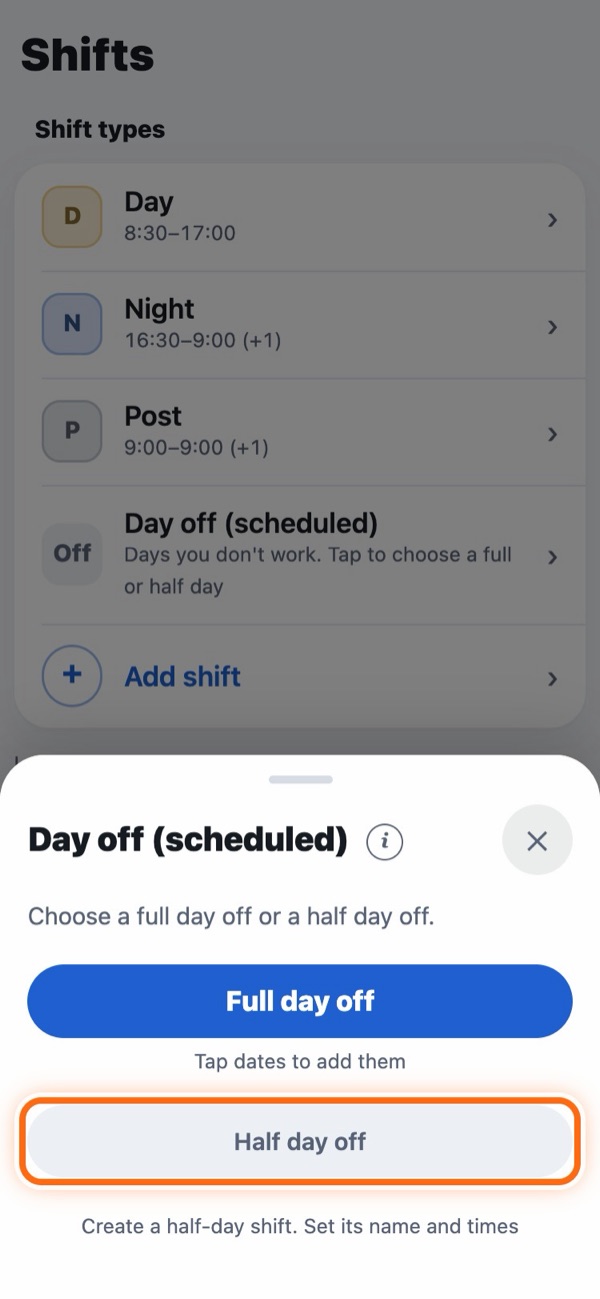
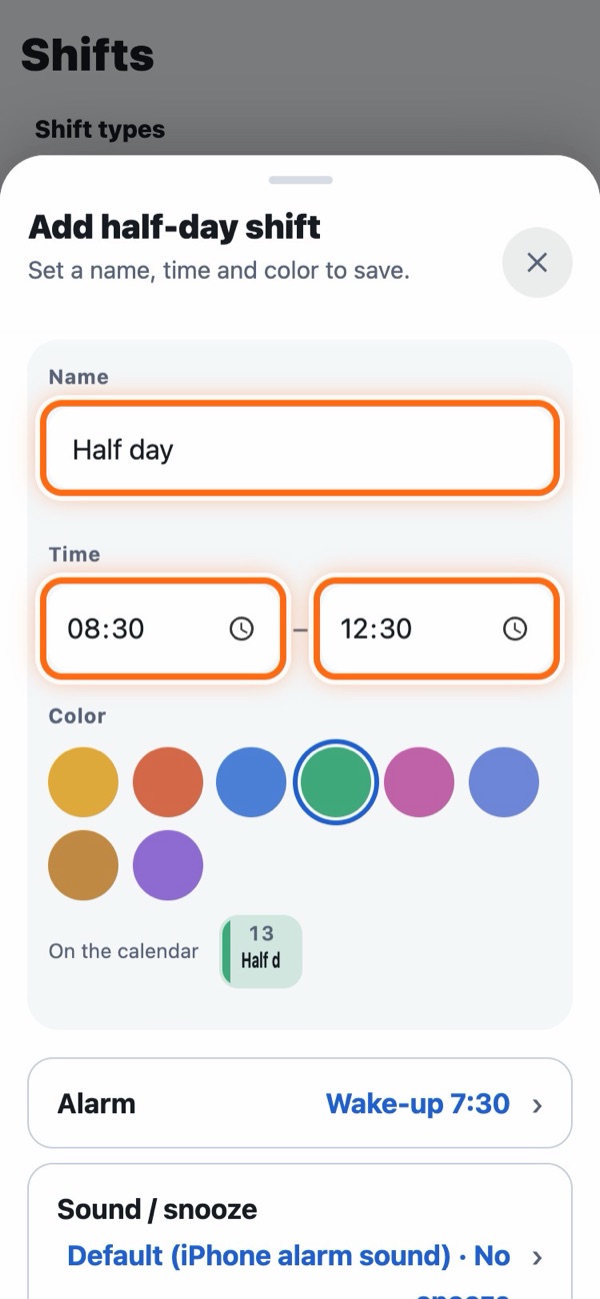
- You don't need to create days off: “Day off (scheduled)” is ready from the start. Tap it to choose Full day off or Half day off (see Half day off).
- Post-night and off-duty days: If a shift's name starts with “Post”, or includes “Post-night” or “Off duty”, it becomes a shift that isn't counted in your days worked or hours worked.
- Shifts that always include overtime: Open the Break, overtime, counting row and set “Overtime”. Days with that shift are counted as overtime.
- If you change the times: All days with that shift change too, including past months.
- Reorder or delete: Long-press the shift list to switch to edit mode. Drag “≡” on the left to reorder, or tap the red circle on the right to delete (you'll be asked to confirm). When you're finished, tap Done.
- You can create up to 12 shift types.
Half day off (e.g., working Saturday mornings)
For people who work only half the day on some days, like Saturday mornings. The monthly summary counts the other half as 0.5 day off.
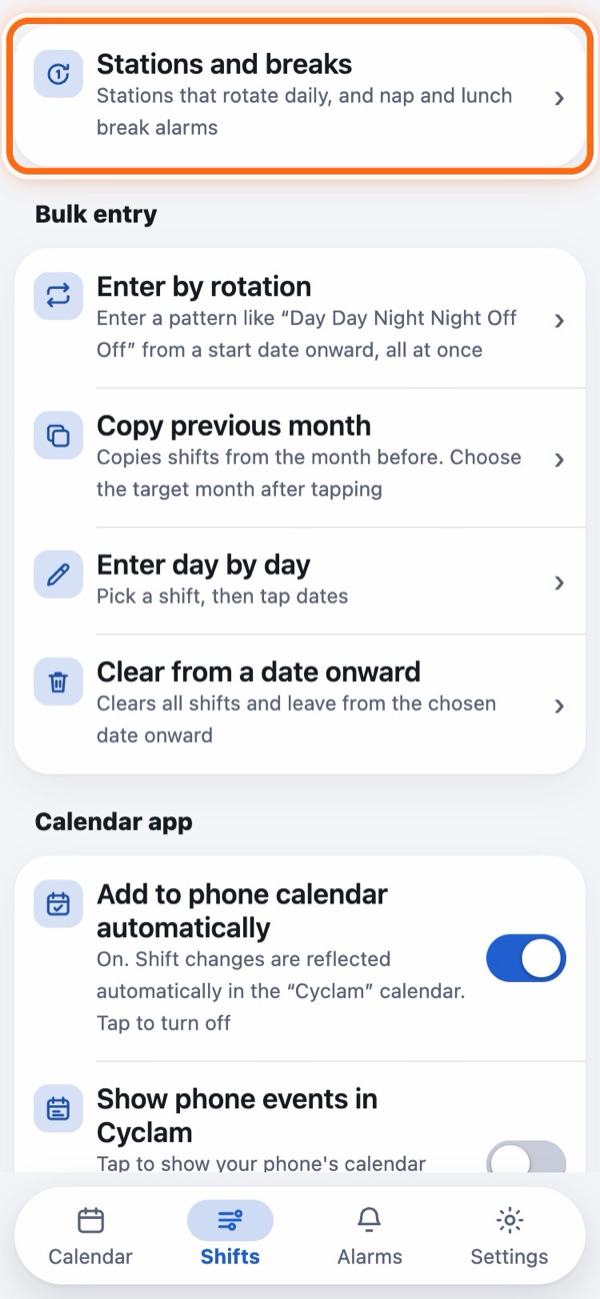
Stations and breaks
This is for workplaces where your station (the area or order you're assigned) rotates each day, and for people who want alarms for naps or lunch breaks.
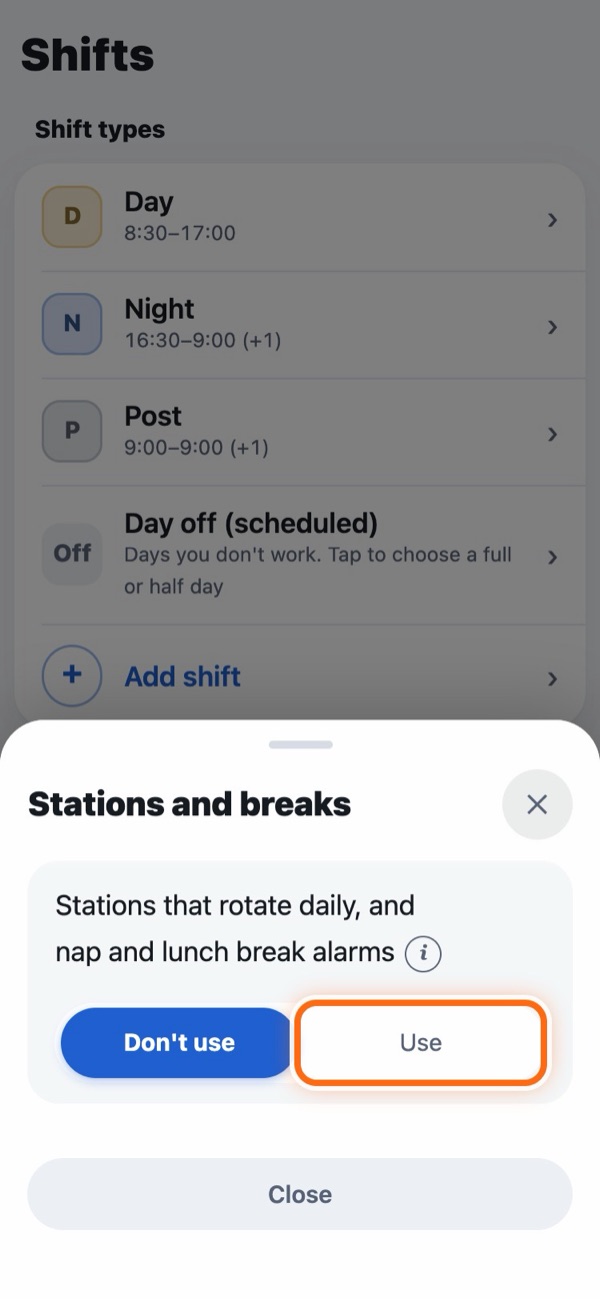
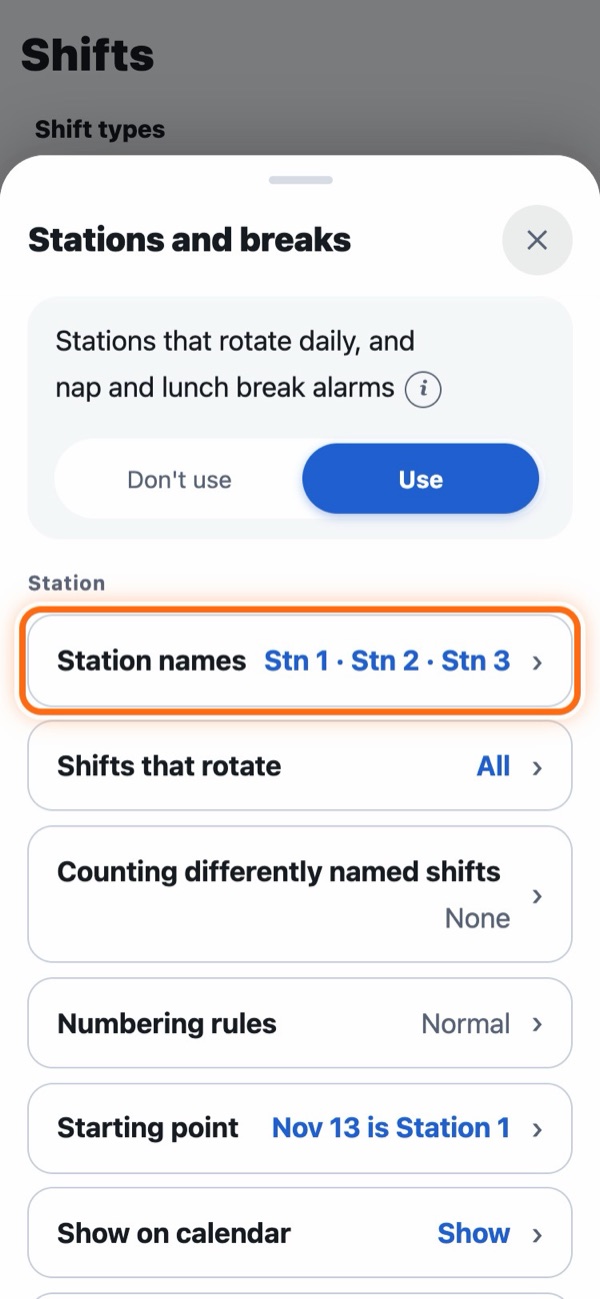
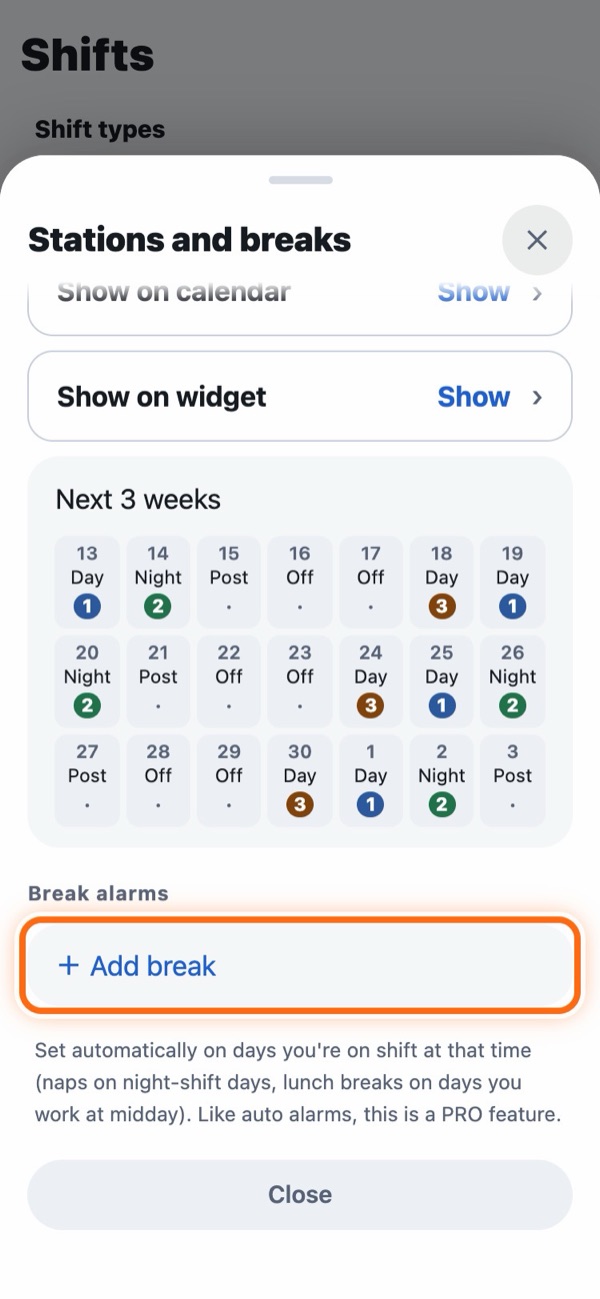
More (rotation, break alarms)
- Layout: The items inside (Station names, Shifts that rotate, Counting differently named shifts, Numbering rules, Starting point, and whether to show on the calendar and widget) are each folded into one row, with the current settings on the right. Tap a row to open it. The “Next 3 weeks” preview is always shown.
- Stations: Open the “Station names” row and enter the number of stations (2 to 6) and their names. Names are optional (only numbers are shown then). On each day with a rotating shift, it moves on: Station 1 → Station 2 → Station 3 … It doesn't move on days off or post-night days (it does move on days you take paid leave).
- Shifts that rotate: Stations rotate only on the shifts you choose. If only the night-shift nap order rotates at your workplace, choose only the night shift.
- Counting differently named shifts: If a shift has a different name (for support, cover or extra days) but is really one of your other shifts, you can count it as that shift (for example, count “Day (Support)” as Day). Even within the same team, people set up their shifts differently, so if your numbers get out of step, match them here (this appears when you have 2 or more shifts).
- Numbering rules: Normally the number goes up by one on each shift day. If there's a rule like “skip one on the first day of this shift”, tap + Add rule and choose which shift, whether it's the first day only or every time, and whether to skip one number, keep the same number as the previous shift, or go back one number. Check the order in “Next 3 weeks” below.
- Starting point: Set the station for one day, and the days before and after follow from it. Check the order in “Next 3 weeks”.
- Show on calendar and widget: A colored dot and number appear at the bottom right of each shift day's cell. On days with a break alarm, the dot gets a ring around it. You can choose the calendar and the widget separately.
- Change just one day: On the date screen, open the “Station” row (“Station & nap” on nights where you set naps by day) and tap a number to change it for that day only. Even if you change the shift for a single day, for example to work on a day off, the stations after it don't shift.
- Break alarms PRO: Tap + Add break to set the time of a nap or lunch break and its alarms. You can have a “Start alarm” that rings when the break starts (or some minutes before), and up to 2 “wake-up alarms” that ring some minutes before it ends. Alarms you don't use appear as buttons such as + Add start alarm; tap one to add it. Open “Sound / snooze” to give break alarms their own sound and snooze (at first they use the same sound as the shift). They're set automatically on days when you're working at that time (they don't ring in the web version).
- How times are set: Under “Time” on the break screen, choose Same for all (the same time every time), By station (different times for Station 1, Station 2…), or By day (choose early or late nap for each night; see below).
- Turn each break on or off: In the “Break alarms” list, turn off the switch on the right of a row and that break no longer rings. Its settings are kept, so turn it back on and it rings again. Breaks that are turned off show “Off (won't ring)” in faded text.
- Times for other stations: For breaks set by station, the ring time for each station in use is shown under the alarm row. From the second one on, open them with Also show Stn 2 · Stn 3.
Set night-shift nap times by day PRO
This is for people whose nap time changes from night to night, like “a night when only early nappers are on”, “4 nights in a row as early, early, late, late”, or “next block of nights is late, late, early, early”. Choose By day under “Time” on the break screen. Tap i next to “Nap slots” to open color-coded steps.
Step by step
- Create nap slots: At first there are 2: “Early nap” and “Late nap”. You can change their names and times, and add up to 4 with + Add slot (at least 1 is needed).
- Set your usual pattern: Starting from the first night of a run of night shifts, line up which slot you nap in. Tap a square to switch E → L → None, and use − + to change the number of days (1 to 8). If your night shifts run longer than the pattern, the pattern repeats. Nights set to “None” don't ring.
- Save the pattern: Tap + Save this sequence to add it to “Saved sequences” (up to 6). With 1, that pattern is used every time. With 2 or more, they're used from the top, one per run of night shifts, and it goes back to Run 1 after the last one. It keeps repeating far ahead, without you entering it again. Tap a saved sequence to bring it up top and rebuild it.
- Change for that day only: In “Upcoming night shifts”, tap the square under a date to change that night only (that run shows “This run only”, and Back to usual pattern puts it back). You can also change it in “Station & nap” on the date screen. If you've saved 2 or more, use Make this Run 1 to choose which run to count from.
The first letter of that night's slot (E, L, etc.) appears at the bottom left of the calendar cell (when stations are shown on the calendar).
Back to contents3. Enter your shifts
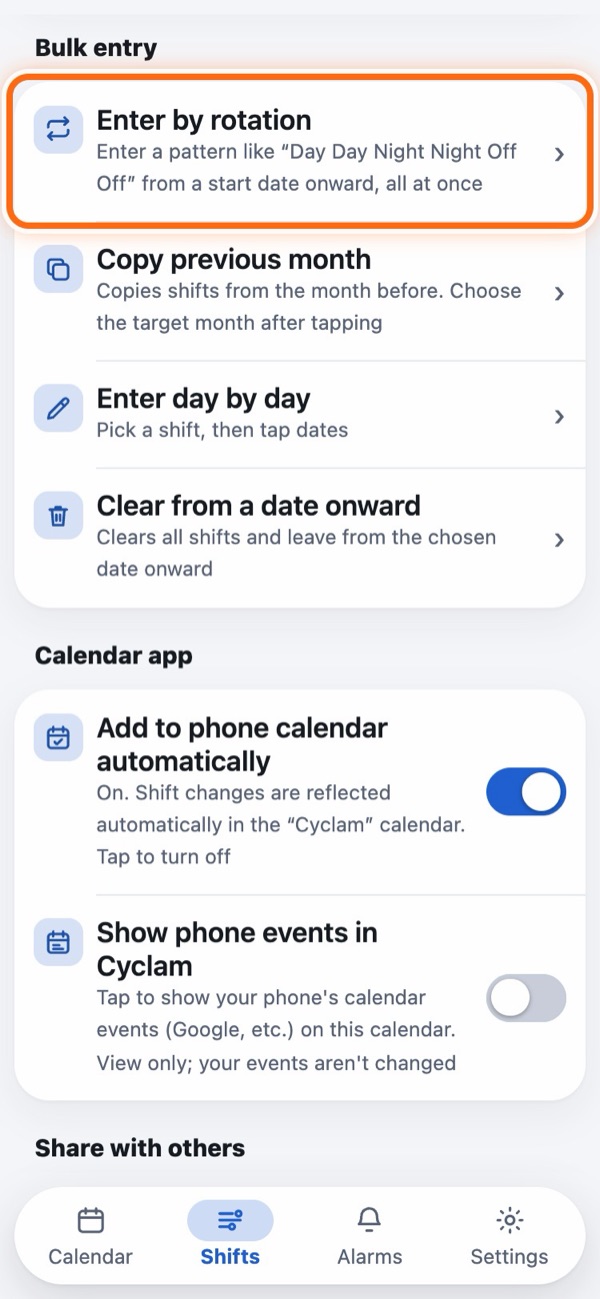
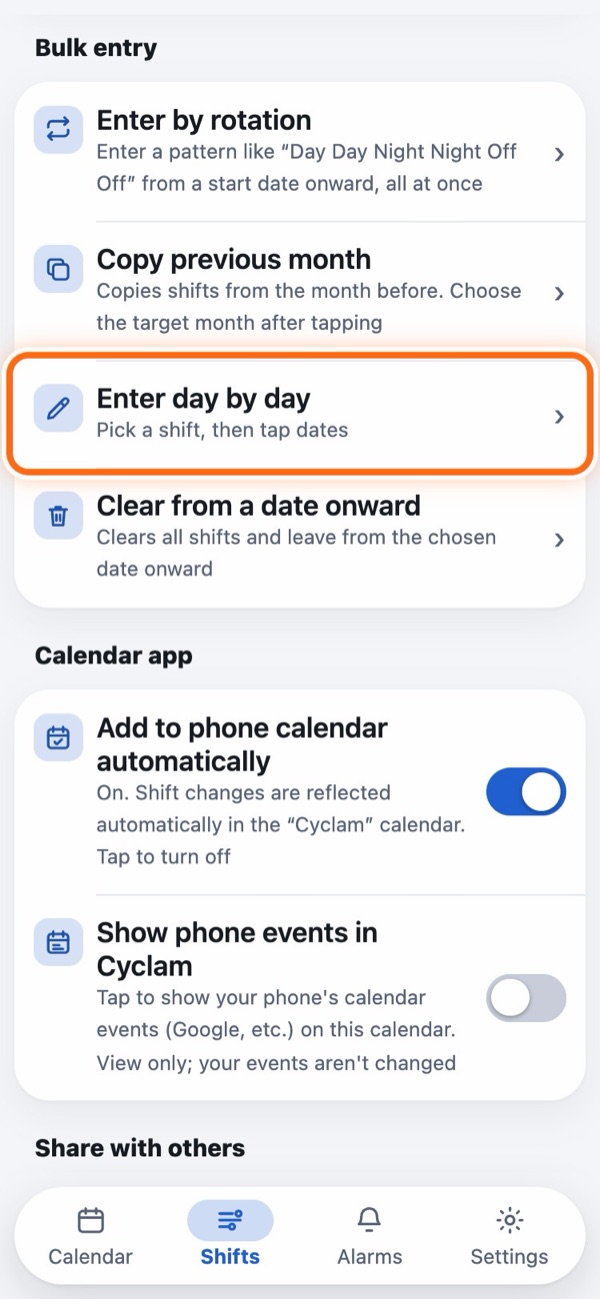
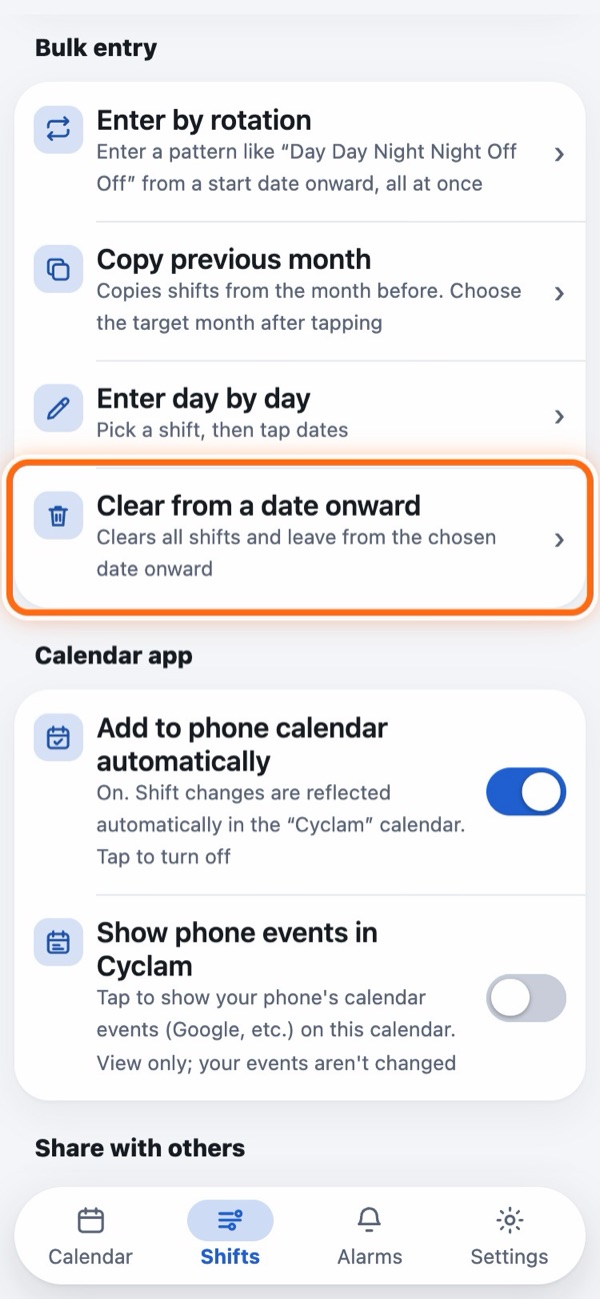
“Bulk entry” on the Shifts tab lists the ways to enter shifts. If your workplace runs on a fixed rotation, “Enter by rotation” is the fastest.
Enter by rotation
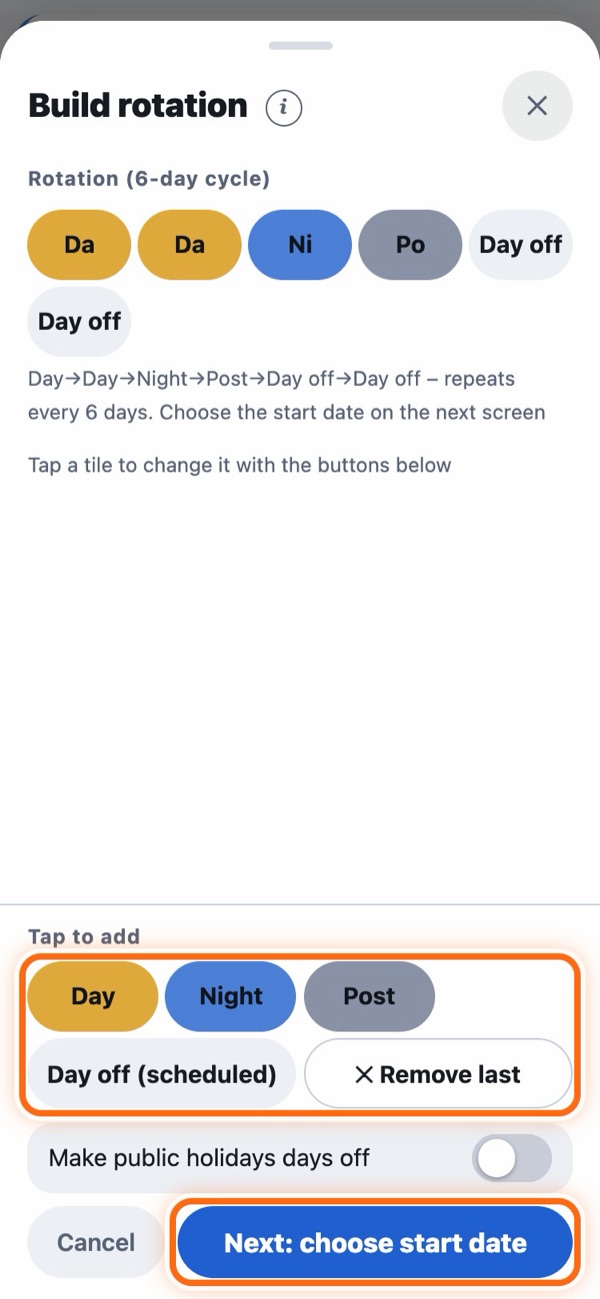
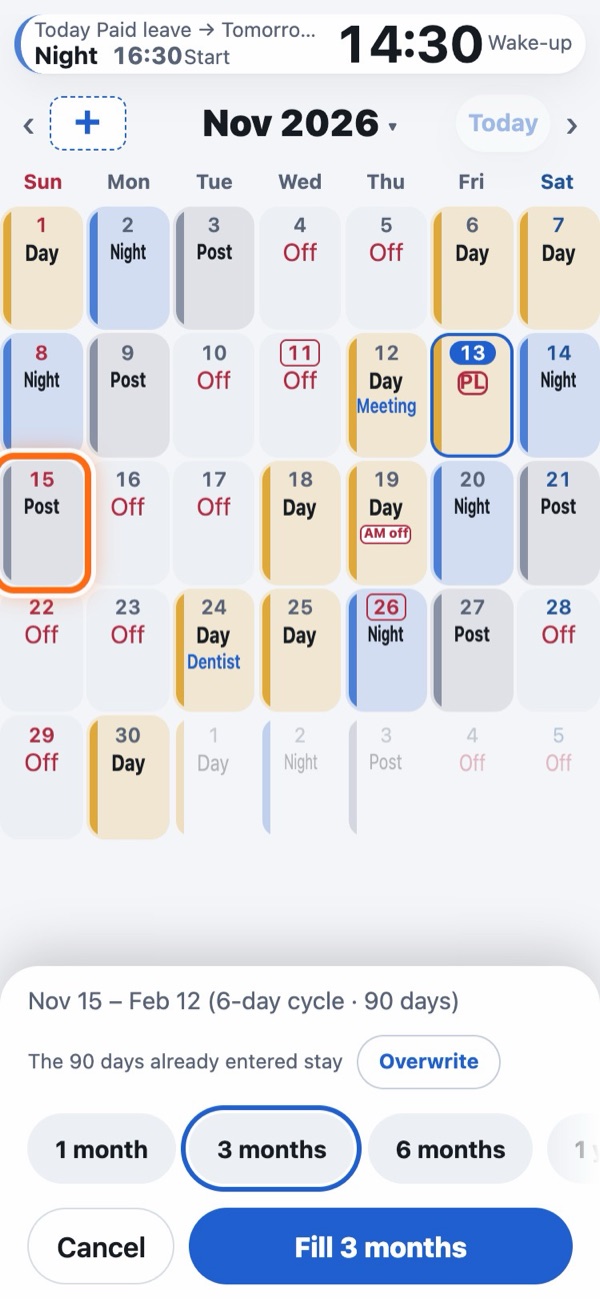
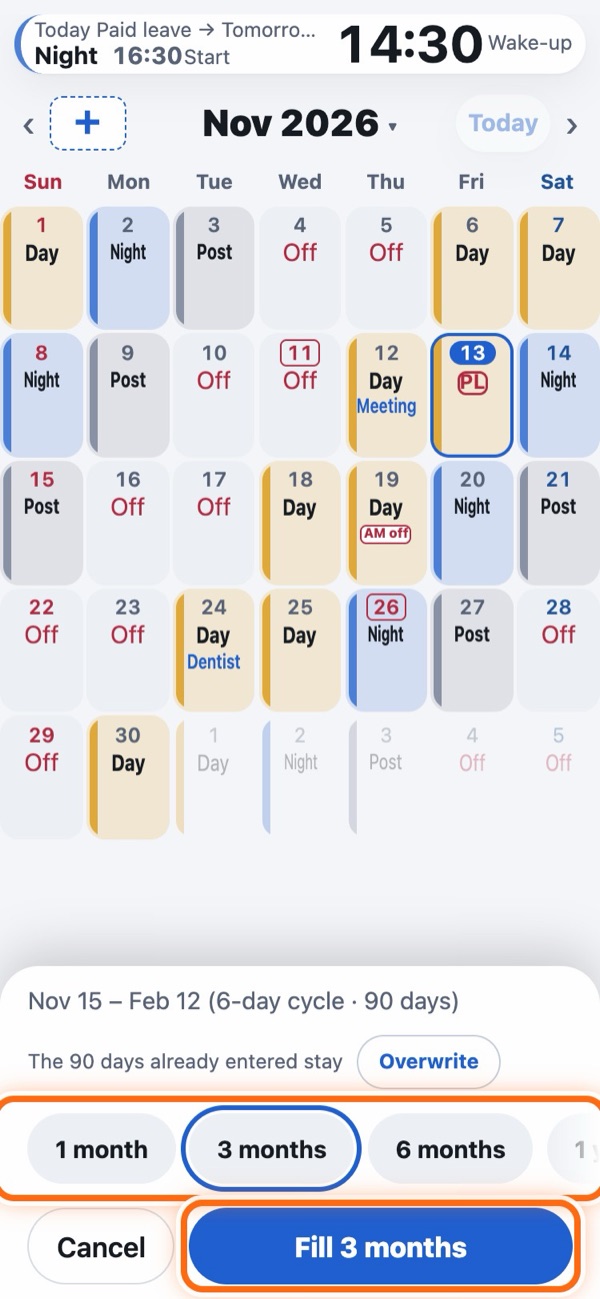
- A cycle can be up to 31 days. If you tap the wrong one, tap ✕ Remove last.
- To make public holidays days off, turn on Make public holidays days off. It's already on if you have only one working shift (shifts for a Half day off don't count).
- Days that already have shifts are left as they are. To replace them, tap Overwrite, which appears below.
Change a tile in the middle, or start in a later month
Tap that tile in the sequence at the top, and ← Earlier ✕ Remove Later → appear below. When you're done, tap Deselect (back to adding) (tapping the same tile again also takes you back). To start in a later month, tap › at the top to move ahead, then tap the day.
Enter day by day
For workplaces without a fixed rotation, or when you only want to change a few days.
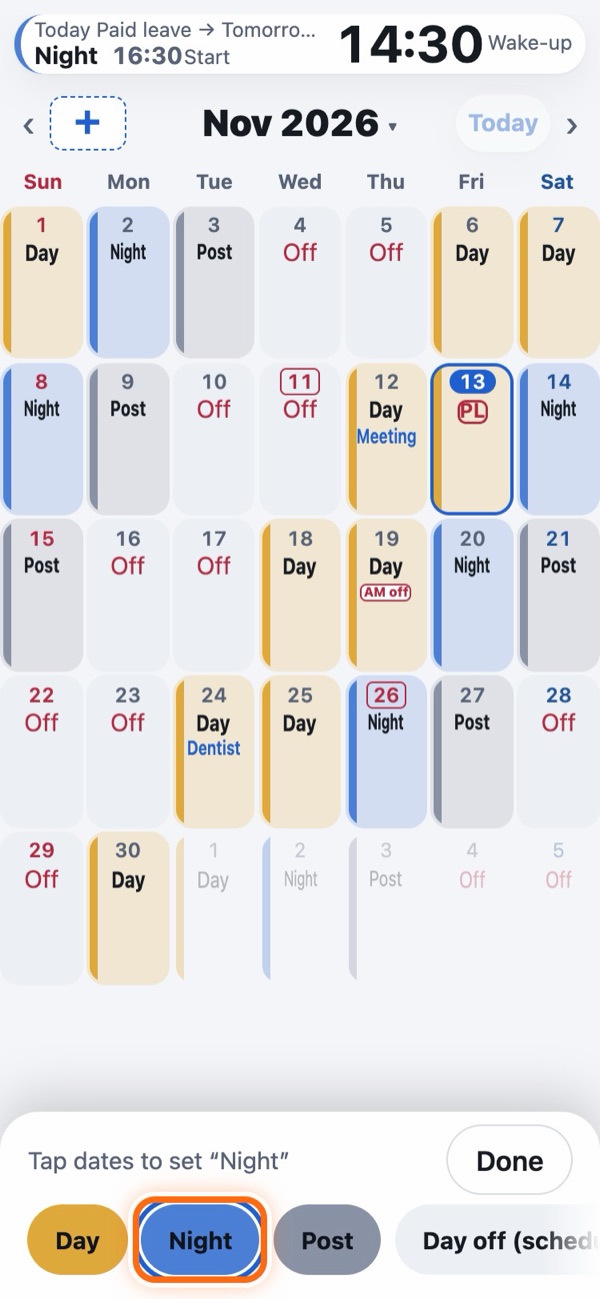
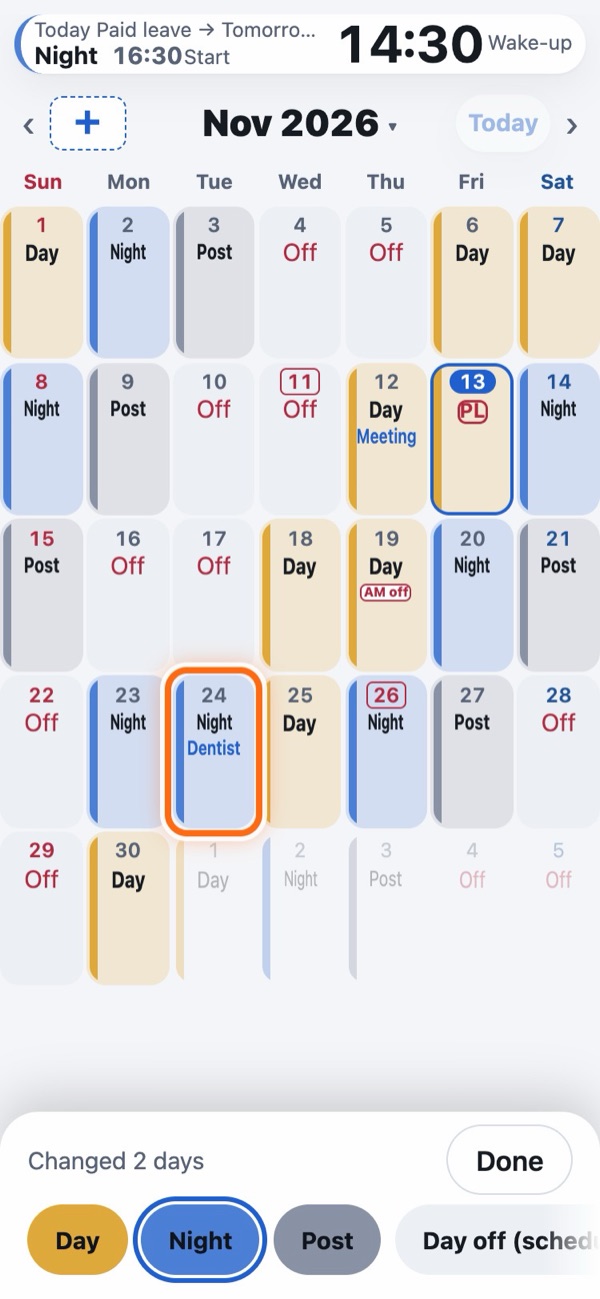
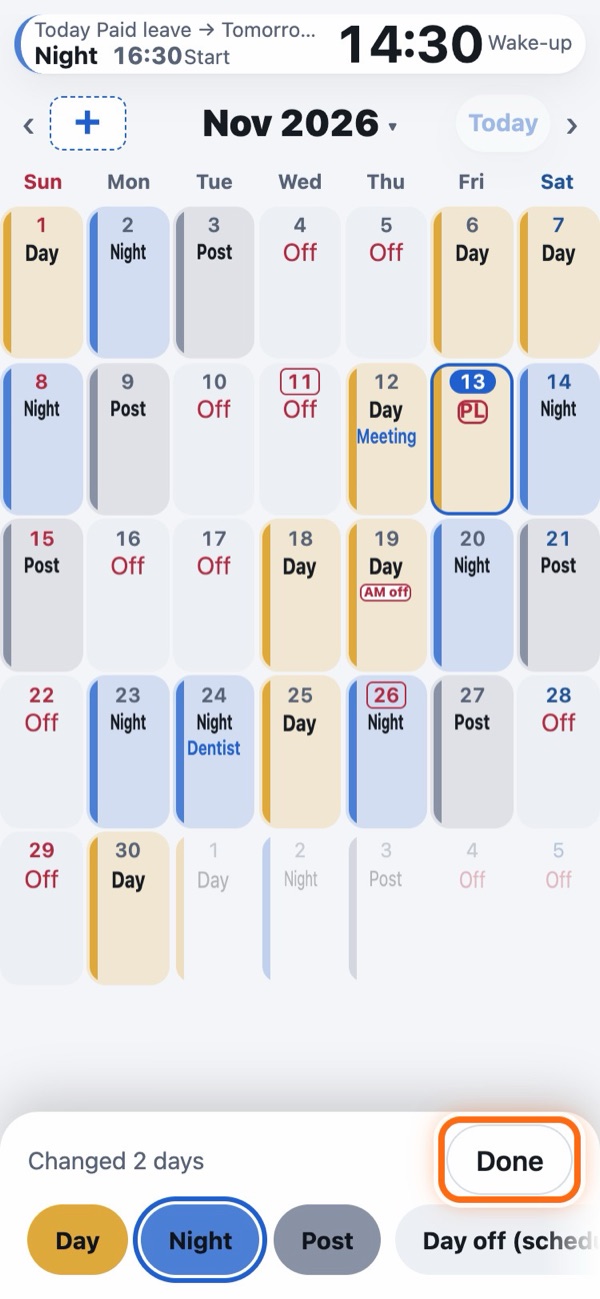
The bar at the bottom also has Day off, ✕ Clear, and leave such as Paid leave.
Roster photo PRO
Keep photos of the paper roster and annual holiday calendar you get at work. In months that have a photo, the button to the left of the month shows that photo.
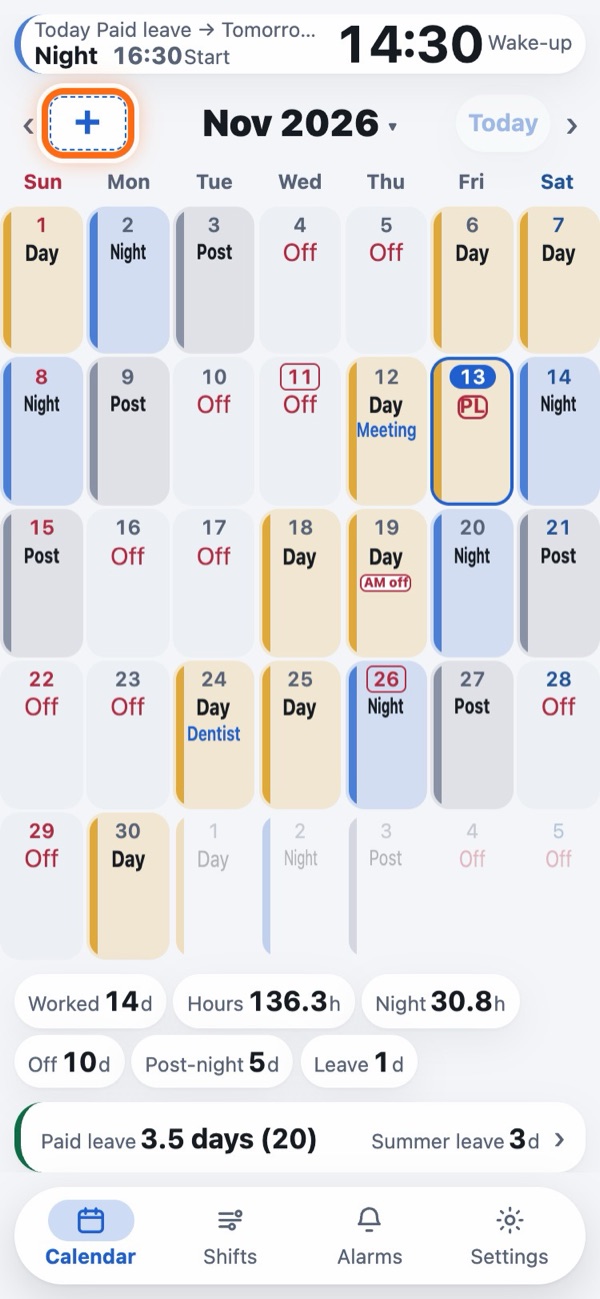
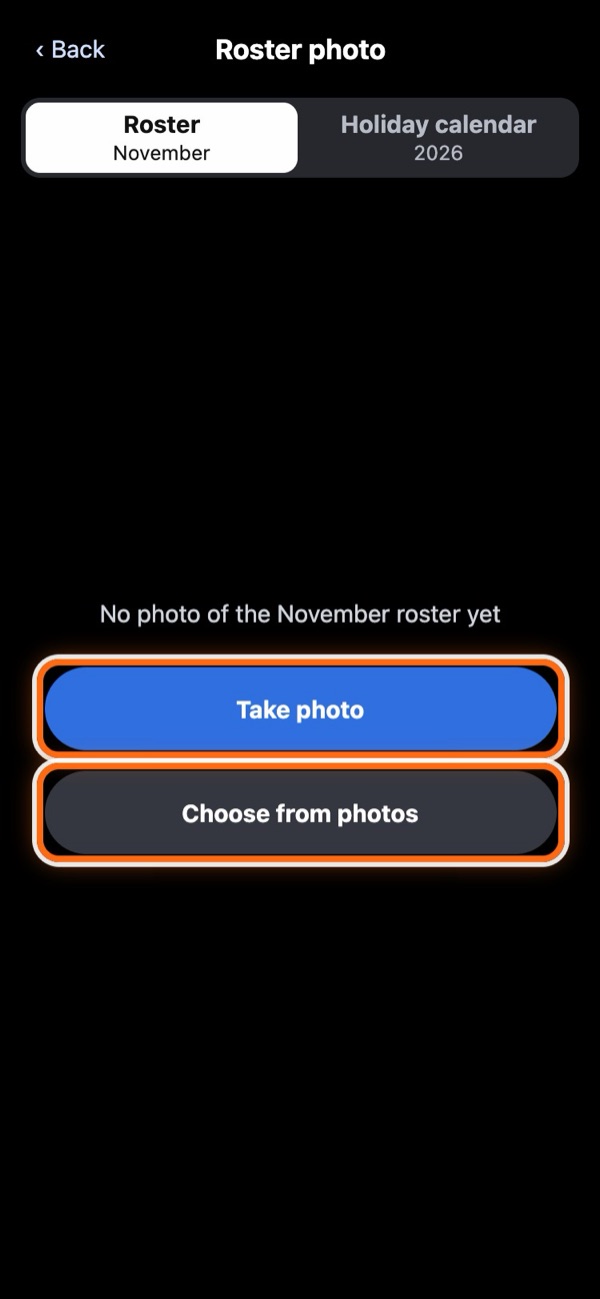
More (view, retake, send)
- Take or choose: Choose Roster (for that month) or Holiday calendar (for that year) at the top, then tap Take photo or Choose from photos. You can keep one photo per month and one per year.
- View: Spread two fingers to zoom in and read small text. Swipe left or right to move to the photo for the previous or next month (or year, for the annual holiday calendar).
- Change, keep or send: At the bottom, Retake, Crop (you can undo if you make a mistake), Save to Photos (on Android, Save to Gallery) and Delete (you can undo right after), plus Send at the top right (to a messaging app, etc.).
- Enter shifts while looking at it: While you use Enter day by day, that month's photo appears at the top of the screen. Tap Hide to close it, and tap the button to the left of the month to show it again.
Photos are kept only on this phone. They're not included in the backup file. When you switch phones, open each photo on your old phone and tap Save to Photos, then add them again on your new phone with Choose from photos.
Copy previous month
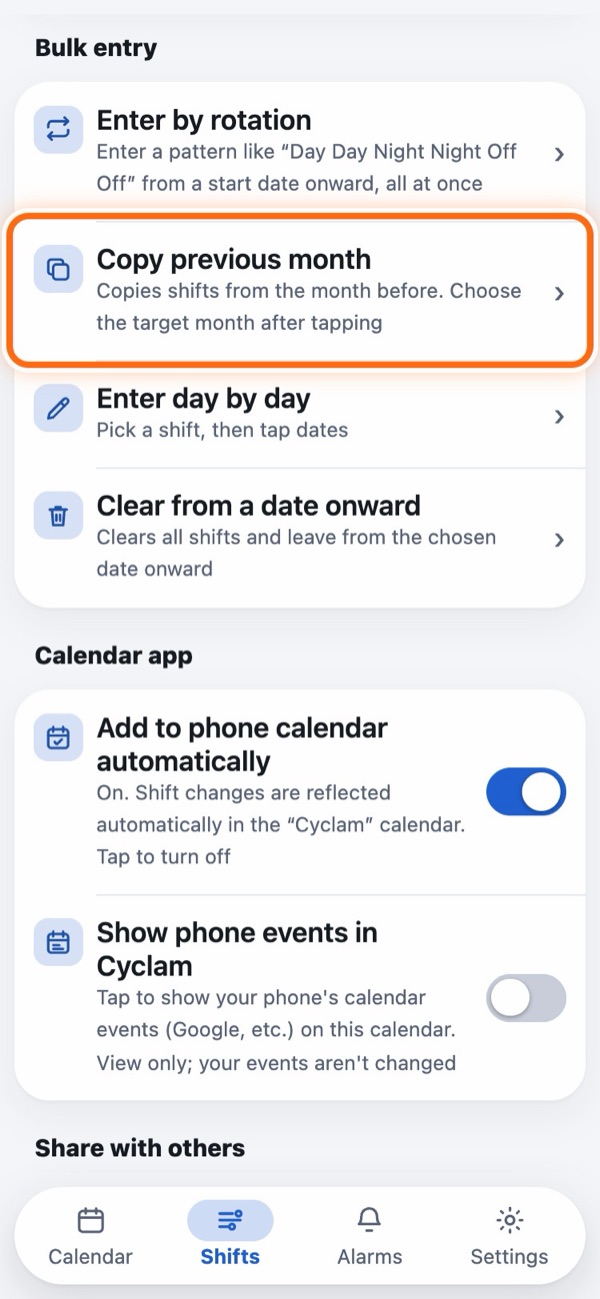
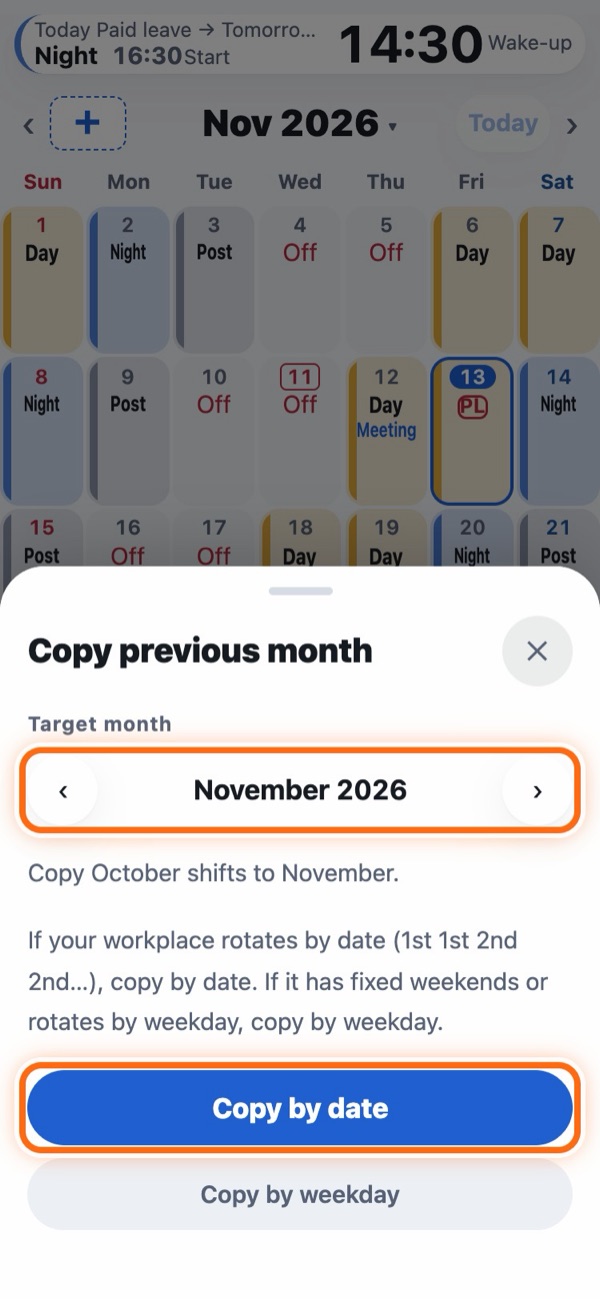
Copies the shifts from the previous month. Choose whether to copy to the same dates or the same days of the week.
Clear from a date onward
Use this when your schedule changes or you entered something wrong.
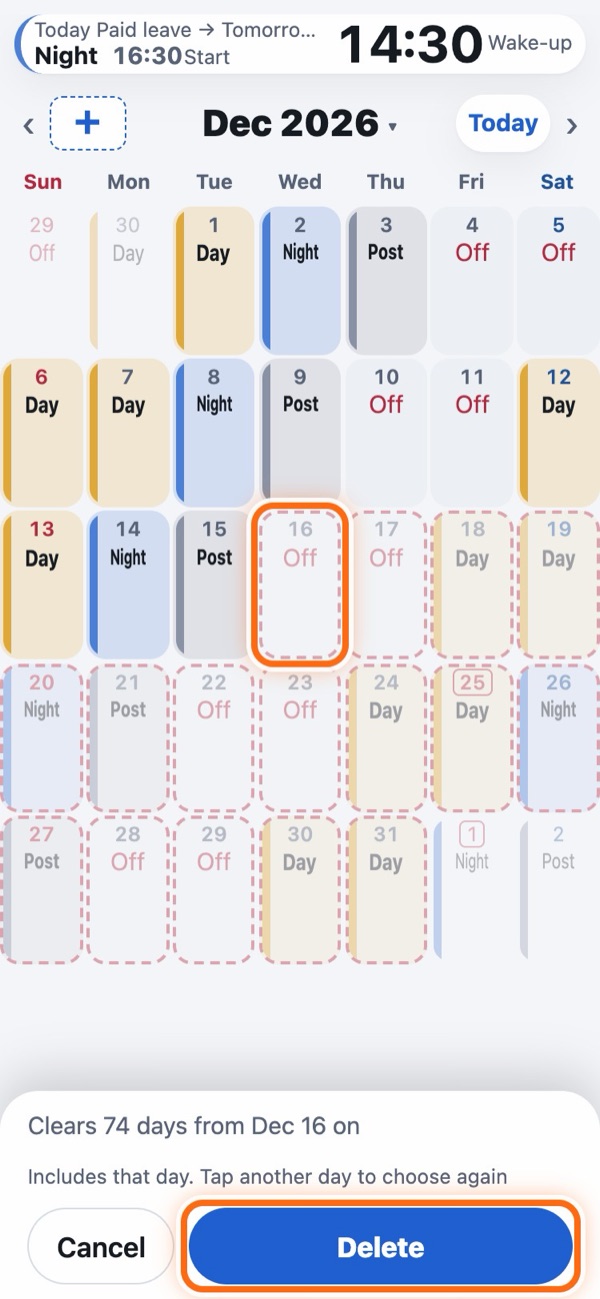
Days to be cleared are faded and outlined with a red dotted line. Tap Delete, and Delete again to confirm. From that day on, shifts, days off, leave (including hourly leave) and hours changed for single days are cleared. Earlier days, your shift types and your notes are not deleted.
If you make a mistake
When you change something, a bar appears at the top of the screen saying what changed. Tap Undo to go back to how it was.
Find days off
Tap the year and month above the calendar, then tap Find days off. Your days off for the next 3 months are listed.
- Switch between All days off, Days off on weekends & holidays and Days off on weekdays.
- Consecutive days off are marked, like “3 days in a row”.
- Tap a row to open that day.
- Post-night and off-duty days are not included.
4. Change one day (early start, overtime, notes)
Tap a date on the calendar to open that day's screen. Changes are saved as soon as you tap.
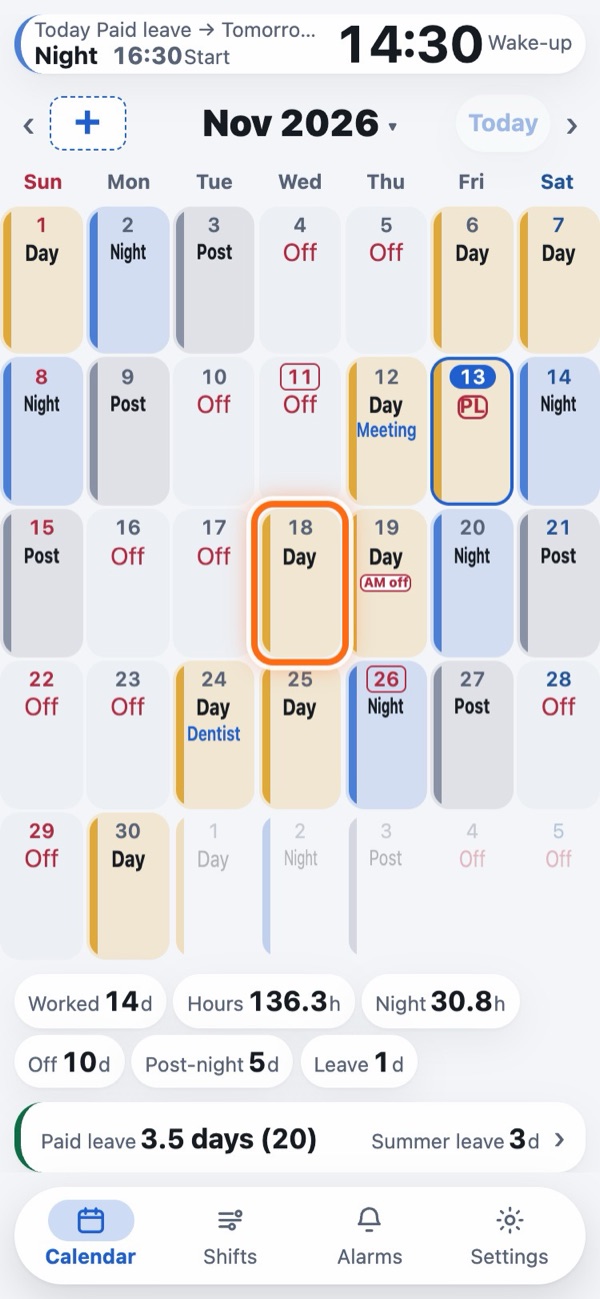
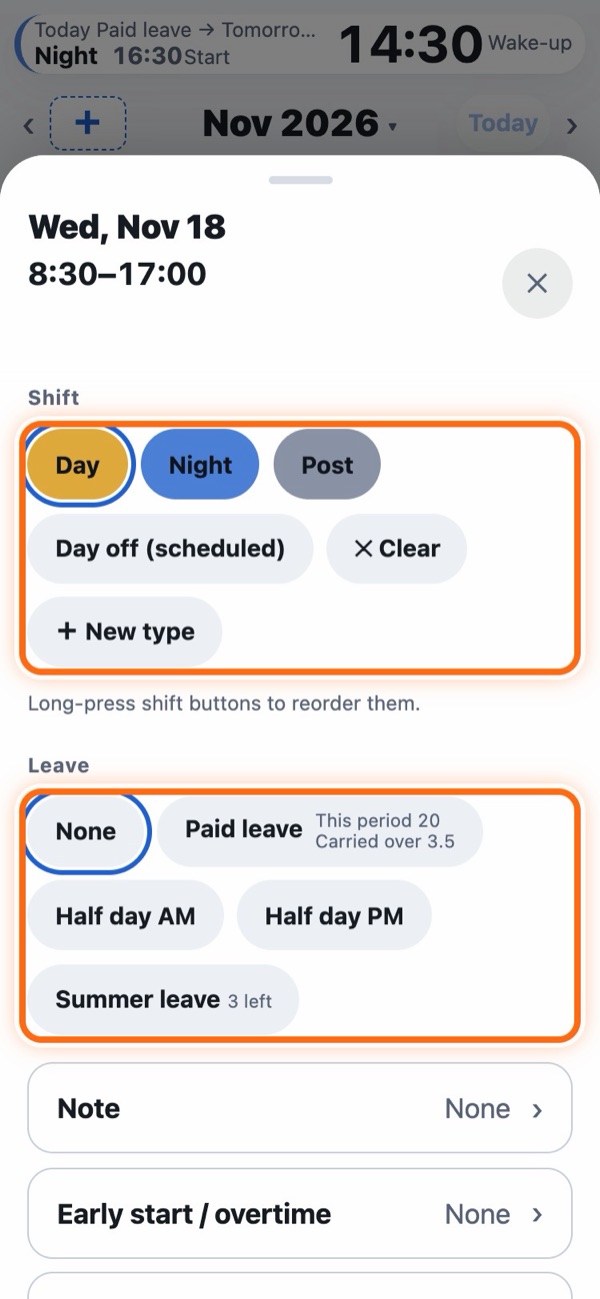
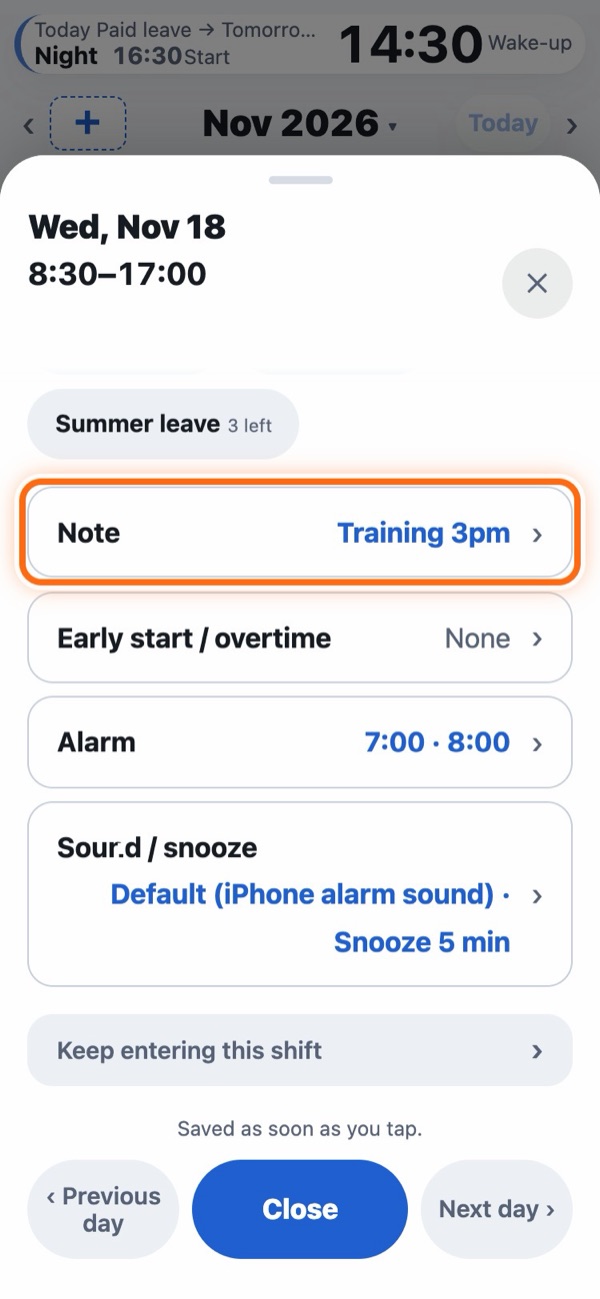
Note, Early start / overtime, Alarm and the other items are each folded into one row, with the current settings on the right (rows for features you don't use are not shown). Use ‹ Previous day Next day › at the very bottom to move to the day before or after.
Row by row (note, important day, early start, alarm, sound)
- Note: Open the “Note” row to write a plan or memo like “Training” or “Dentist”, up to 40 characters. It appears in blue in the cell.
- Important day: On a day with a note, you can set “Important day” in the same row to On. The date gets a colored ring, which is filled in as the day gets closer. Below that, choose from 5 colors (yellow, cherry blossom, green, light blue, purple). Set “Repeat” to Monthly or Yearly and the name and colored ring also appear on the same date next month or next year (the last day of the month if that date doesn't exist). If you change the note on the original day, the name on the repeated days changes too. Open a repeated day to see Open original day › and Stop repeating. In “Advanced display settings” in Settings, set “Make important days glow” to On and a glow in that color runs across the important day's cell every 5 seconds (only for today and later; past days keep just the ring; it starts as Off). A bar like “Car inspection in 3 days” also appears above the calendar (the note becomes the name). Tap View to open that day, or ✕ to close the notice. Your paid leave grant date is outlined in green in its cell (only if you entered your granted days; set “Make grant date glow” to On in the Leave section and a green glow also runs every 5 seconds). The bar at the top shows it only on the day itself (only if you entered your granted days).
- Early start / overtime: Open the row to see that day's start and end times and the break field. Use it when your start or end time is different for just that day. The shift type itself doesn't change.
- On a day you start early, the cell shows “Early” instead of the shift name, with the time, like “from 6:30”. That day's alarms move earlier too.App only
- Extra time worked shows in the cell, like “OT 2:00” (see Overtime and monthly summary).
- Alarm: The times that ring that day are shown on the right of the row. Open it to see “Alarms for this day only (min before shift start)”. Use the switch on the left of each alarm to turn it on or off for that day only (alarms that are off are faded). Alarms you don't use appear as buttons such as + Add another wake-up alarm; tap one to choose a time and add it. If you change “X min before”, that alarm is turned on for that day (see Alarms). App only
- Sound / snooze PRO: The sound and snooze for that day are shown on the right of the row. Tap Change for this day only to choose a sound and snooze just for that day. Tap Change the sound for the “Day” shift to change the sound and snooze of the shift itself, the same way as on the shift screen (this applies to every day with that shift). To undo a change for one day, tap Back to the “Day” shift sound and snooze. App only
How shifts and days off look, cell marks and colors
In Settings > “Display” > “Advanced display settings”, two rows let you choose how cells look. When you tap an option, the one-week preview below (calendar and widget) changes right away.
- How shifts and days off look: How the shift color shows in the cell: Standard, Outline, Darker color or Fill cell. The widget looks the same.
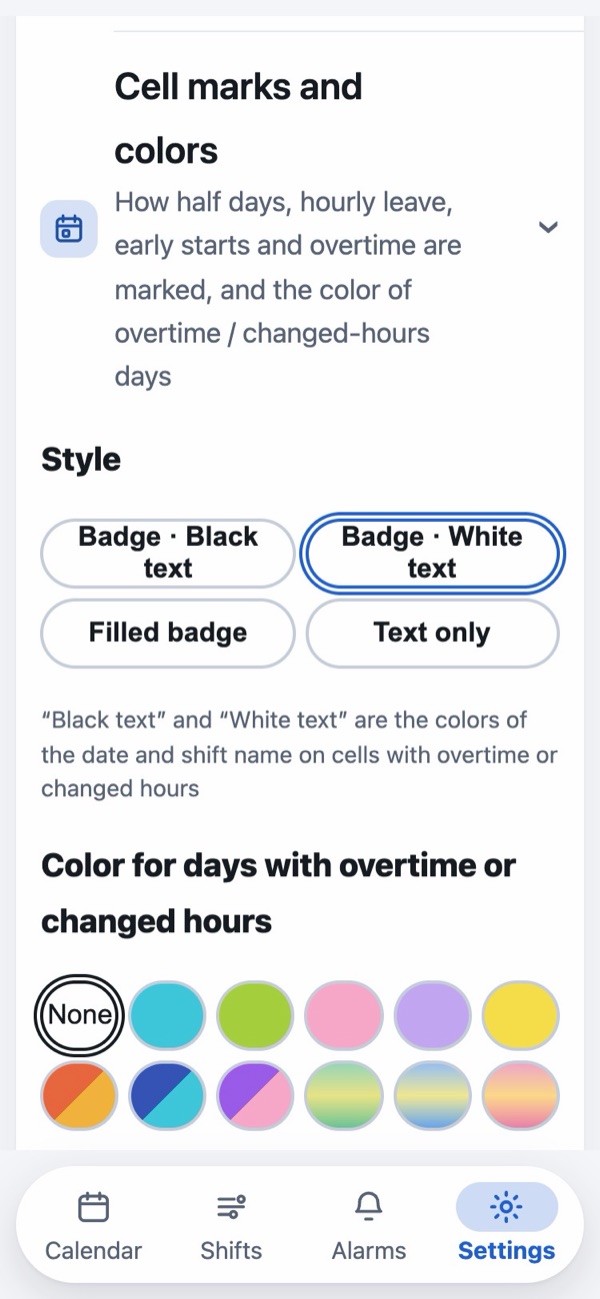
- Cell marks and colors > Style: How the marks for half days, hourly leave, early starts and overtime look: “Badge · Black text”, “Badge · White text” (the default), “Filled badge” or “Text only”. “Black text” and “White text” are the color of the date and shift name in cells on days with overtime or changed hours.
- Cell marks and colors > Color for days with overtime or changed hours: The first row has none, light blue, yellow-green, cherry blossom, lavender and lemon. The second row has two-tone colors (vermilion and gold, navy and light blue, purple and cherry blossom) and translucent colors (green, blue, rose). Choose a color and cells on days with overtime or an early start turn that color.
5. Leave and paid leave balance
First, enter the days you were granted
Enter the days you were granted in “Leave (this period)” on the Settings tab.
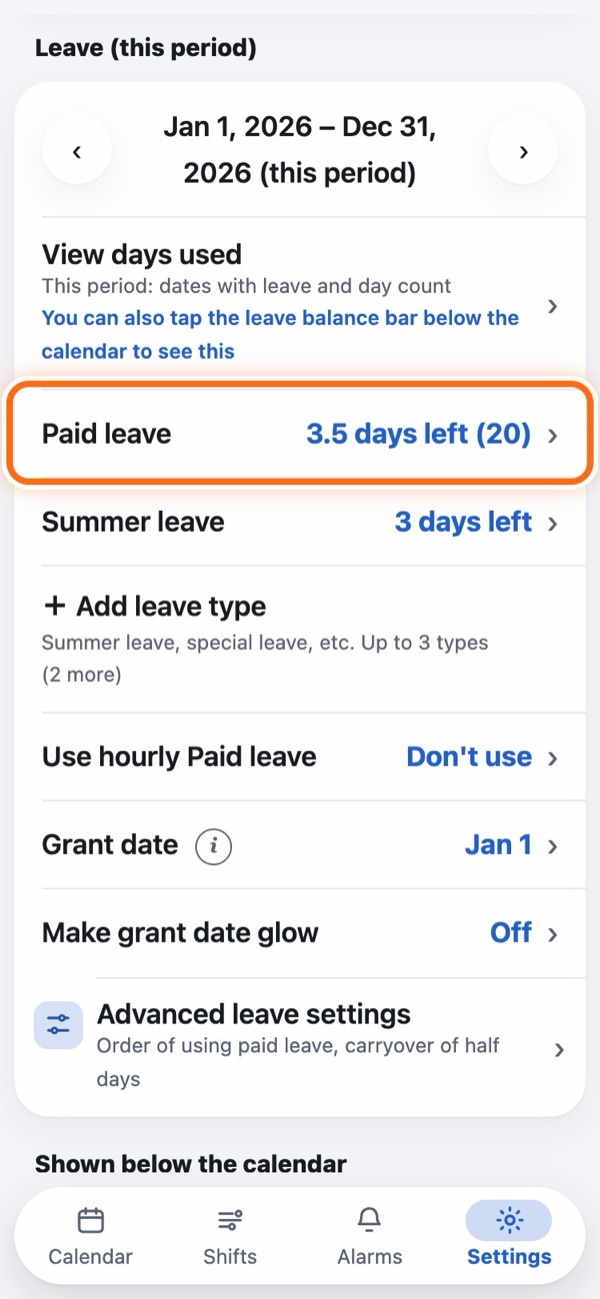
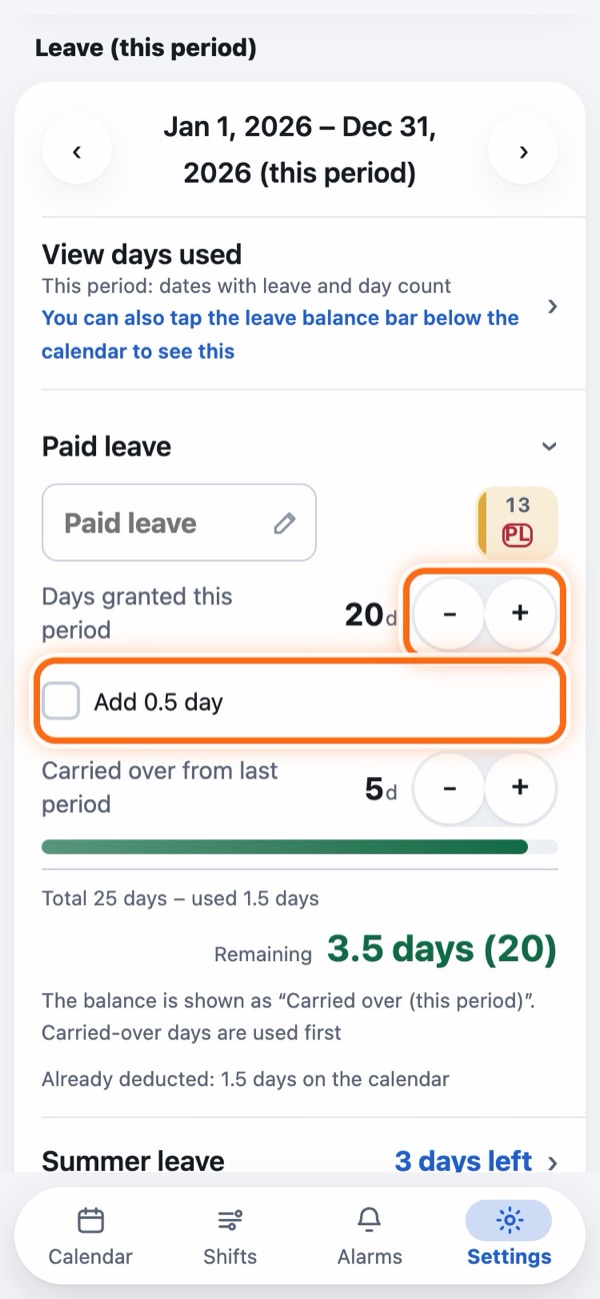
Use + and − to enter “Days granted this period” and “Carried over from last period”. If you have half a day left over, check Add 0.5 day (8 days becomes 8.5 days).
- Name: If your workplace calls it something else, like “PTO”, open the row and type “PTO” in the name field. The app then shows that name.
- Grant date: The month and day your paid leave is granted. It starts as January 1, so change it to match your workplace. On this date, a new period starts and unused days are carried over (see “When a new period starts” below).
- Make grant date glow: Set it to On and a green glow runs across the grant date's cell on the calendar every 5 seconds (it starts as Off).
- Add leave types: You can create up to 3 kinds of leave separate from paid leave, such as summer leave. PRO
Add leave to the calendar
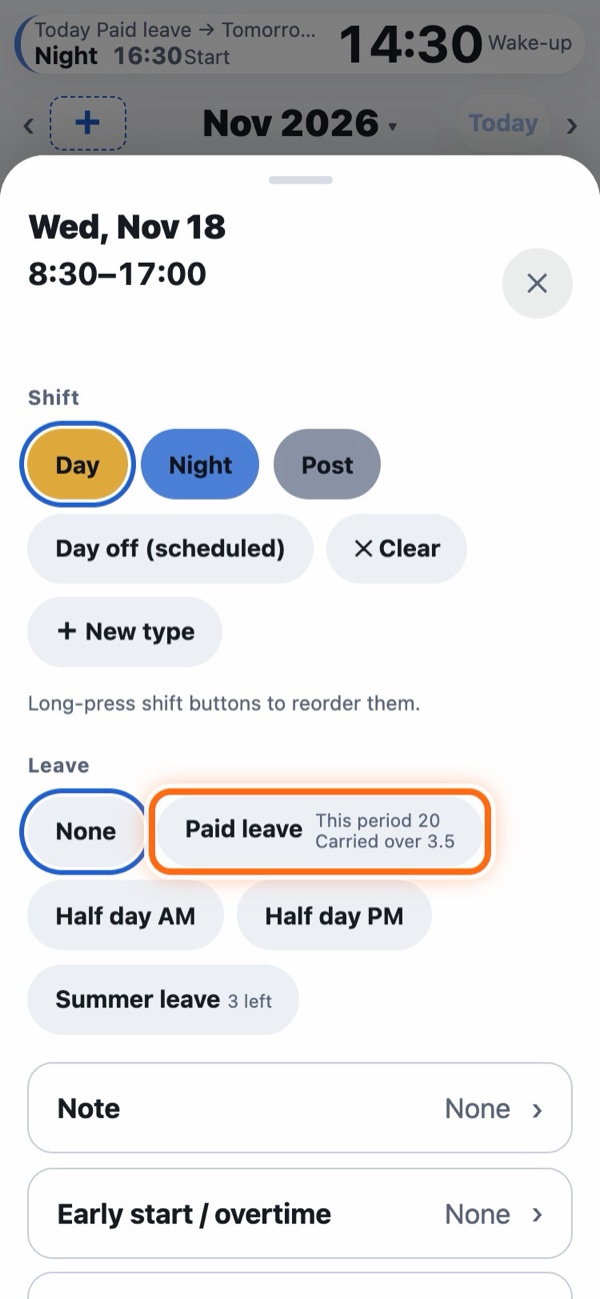
Half day AM, Half day PM and leave types you added are in the same place. To remove it, tap None. You can't add leave to days you don't work, like days off, post-night or off-duty days (you can add it to days with no shift entered yet).
- The buttons show the balance in small text. It turns red at 0 days.
- You can add leave even if your balance is too low (a message at the top says something like “Paid leave” left: 0 days. Saved).
Checking your balance
Your balance is shown in the bar below the calendar and in “Leave (this period)” in Settings. Tap the bar below the calendar to open “Leave history” (a list of days used, and the balance). Change the order of the list with Oldest first Newest first at the top (your choice is remembered).
- Breakdown PRO: If you have carryover, it shows like “3.5 days (20)”. The first number is the part being used up now (carryover at first), and the number in ( ) is the part not touched yet (this period's days at first). Choose which to use first in “Advanced leave settings” > “Paid leave order of use”. On the free version, only the total balance is shown.
- When a new period starts: The same number of days as last period goes into “Days granted this period”, and what's left of last period's grant (whole days only, up to 20 days under Japanese law) goes into “Carried over from last period”, automatically. Last period's carryover expires (under Japanese law, paid leave can be carried over only once). If your workplace's rules differ, adjust “Carried over from last period” by hand. You can change the limit to match your workplace's rules in “Advanced leave settings” > “Carryover limit” (1–99 days). If your company also carries over half days, check Add 0.5 day in the Paid leave row.
Hourly paid leave (hourly leave)
You can also count paid leave taken by the hour. It's only for people who use it, so it's hidden at first.
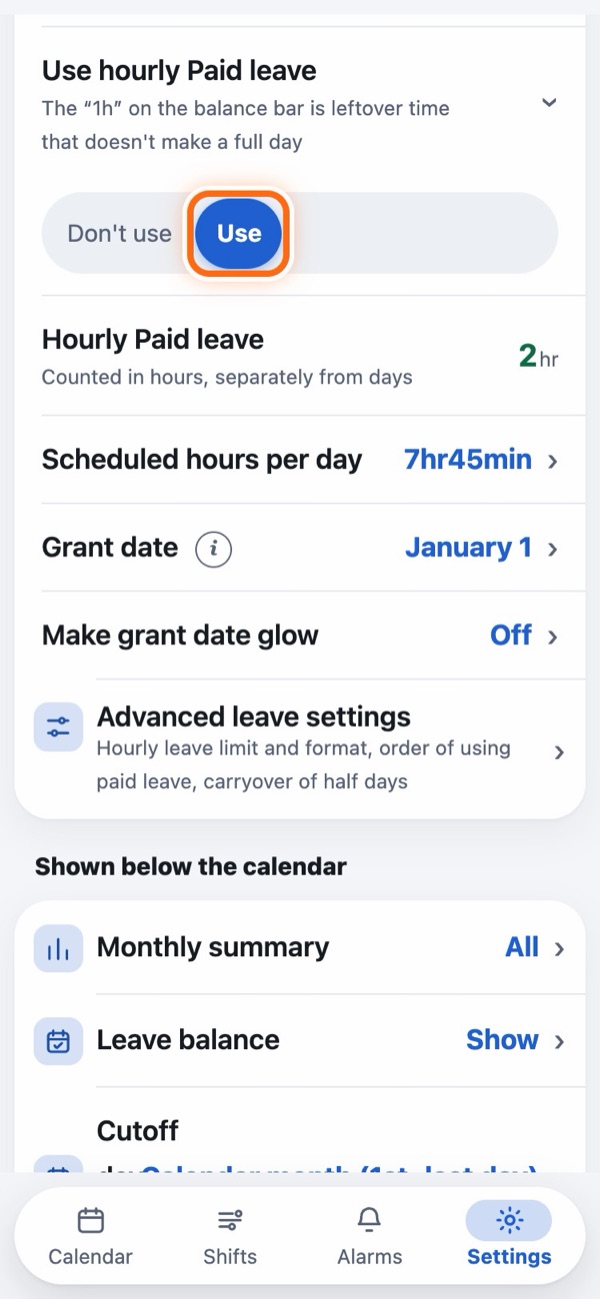
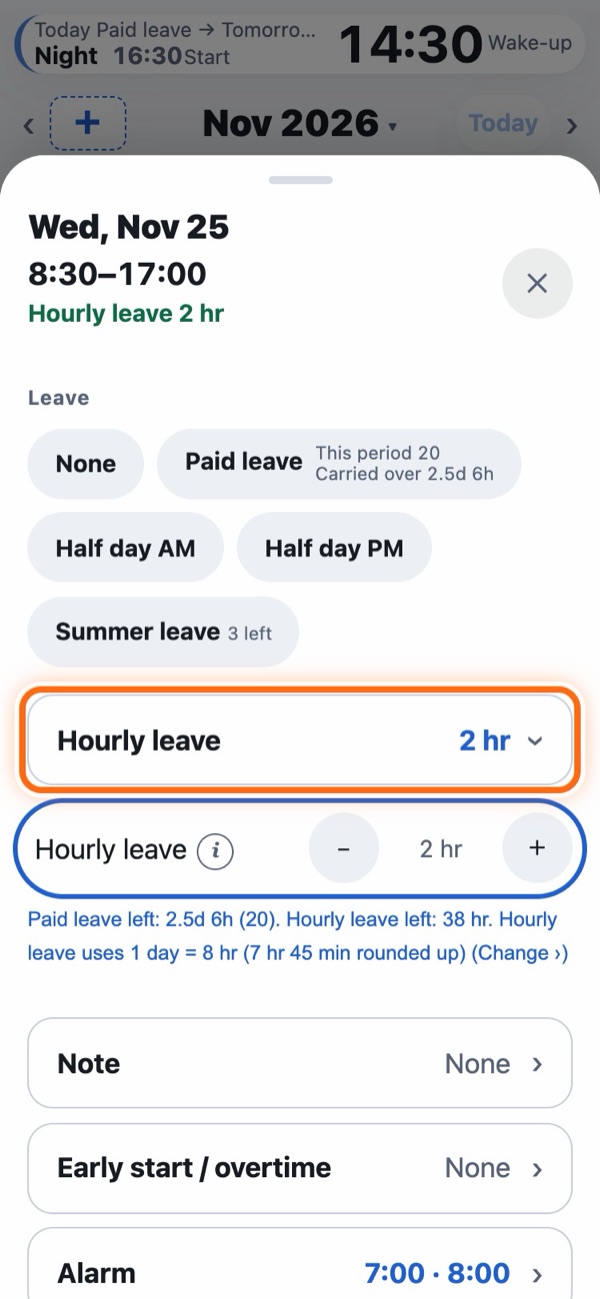
Once it's set to “Use”, set “Scheduled hours per day” just below to your company's working hours per day (not counting breaks). If this is wrong, your balance will be off.
The cell shows “HL 2h”. You can enter up to one day's hours per day, or up to half a day on a half-day leave day.
More (how it's counted, 5-day limit, format)
- How it's counted: Only when you use hourly leave, one whole day is broken into hours and subtracted. One day is your scheduled hours, rounded up to the next full hour (7 hours 45 minutes becomes 8 hours). Example: 2 hours from 23.5 days → 22.5 days and 6 hours. The 0.5 day of a half day can't be broken into hours.
- Up to 5 days a year: By default, you can take hourly leave for up to 5 days a year (5 days under Japanese law). When it's used up, + on the date screen can no longer be tapped. The hours you have left are shown on the date screen and in Leave history. If your company's rules are different, change it in “Advanced leave settings” > “Hourly leave limit”.
- Format: Choose whether time used is written as “10 hr” or “1 day 2 hr” in “Advanced leave settings” > “Hourly leave format”.
- Monthly summary: Hourly leave time is subtracted from your hours worked.
- Days you came in late or left early: You can enter the times you actually worked in “Early start / overtime” on the date screen, or leave it as is. Time cut short up to the hourly leave amount is counted as hourly leave, so it isn't subtracted twice, and the cell color doesn't change. On days you come in late, changing the start time also moves your wake-up alarm later.
The days shown are estimates based on what you entered. Check the official numbers with your workplace records.
6. Overtime and monthly summary
The app adds the time extended in “Early start / overtime” on the date screen to each shift's “Overtime” to estimate how much longer than usual you worked. It may be counted differently from your company.
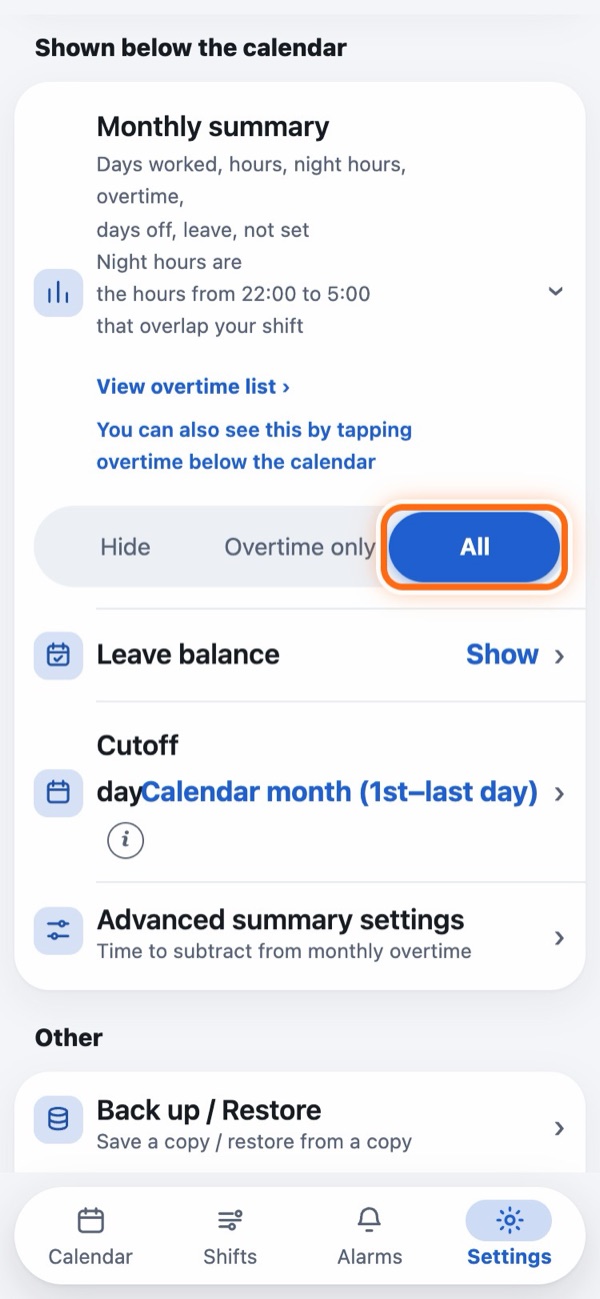
- Show the monthly summary: In Settings > “Shown below the calendar”, open the “Monthly summary” row and choose Overtime only or All. With All, you also see days worked, hours worked, night hours, days off and more.
- Overtime list: Tap the overtime below the calendar (with All, the overtime in the monthly summary) to see the days with overtime, their hours and the total. Tap a row to open that day. You can also open it from View overtime list ›, which appears when you open the “Monthly summary” row in Settings.
- Cutoff day: If your pay period doesn't end at the end of the month, open the “Cutoff day” row in the same place to change it.
- Time to subtract from monthly overtime: If your scheduled hours include “fixed overtime”, go to “Shown below the calendar” > “Advanced summary settings”, open the “Time to subtract from monthly overtime” row and set that time. It's subtracted from the monthly total, and months that fall short show in red, like “-1:30”. To skip months without fixed overtime, remove them under “Months to apply” below.
7. Alarms App only
Set alarms automatically PRO
Set “how many minutes before start to wake up” for each shift type, and alarms are set automatically on days with that shift. They're set up to the last day of the shifts you entered (up to 1 year ahead).
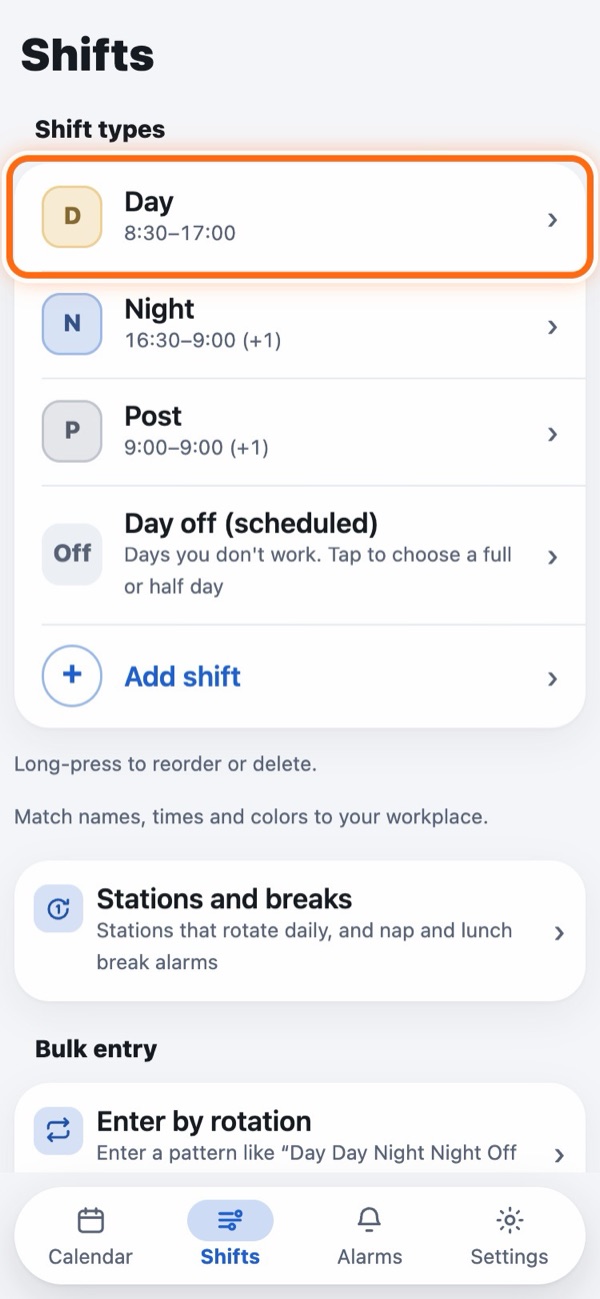
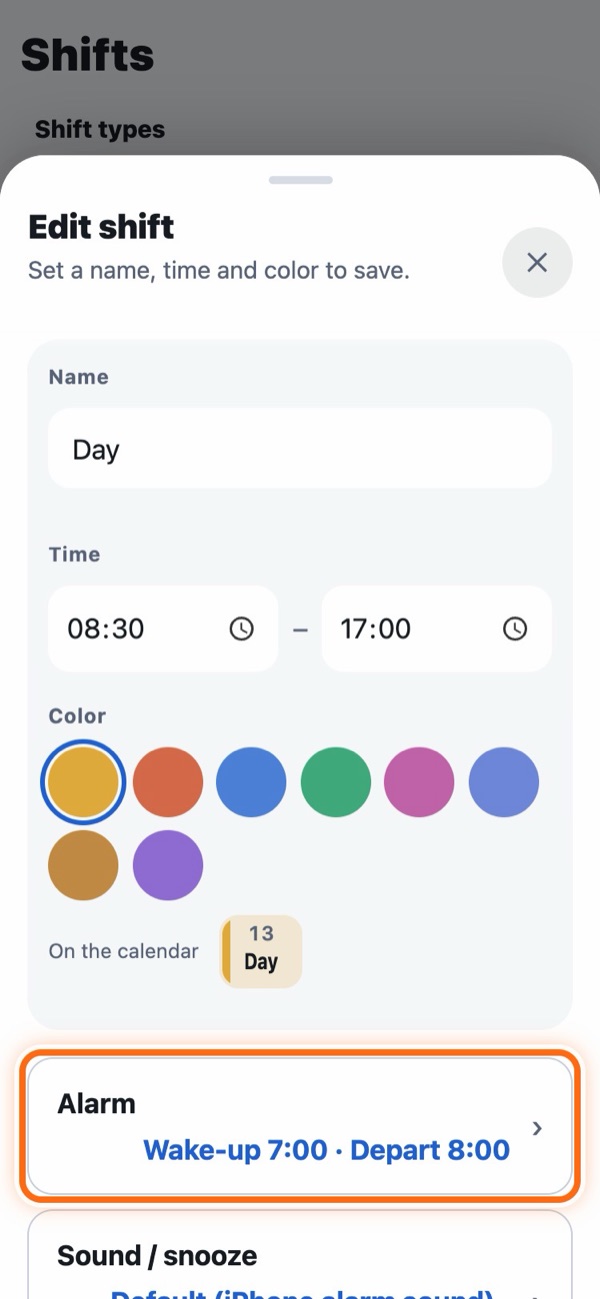
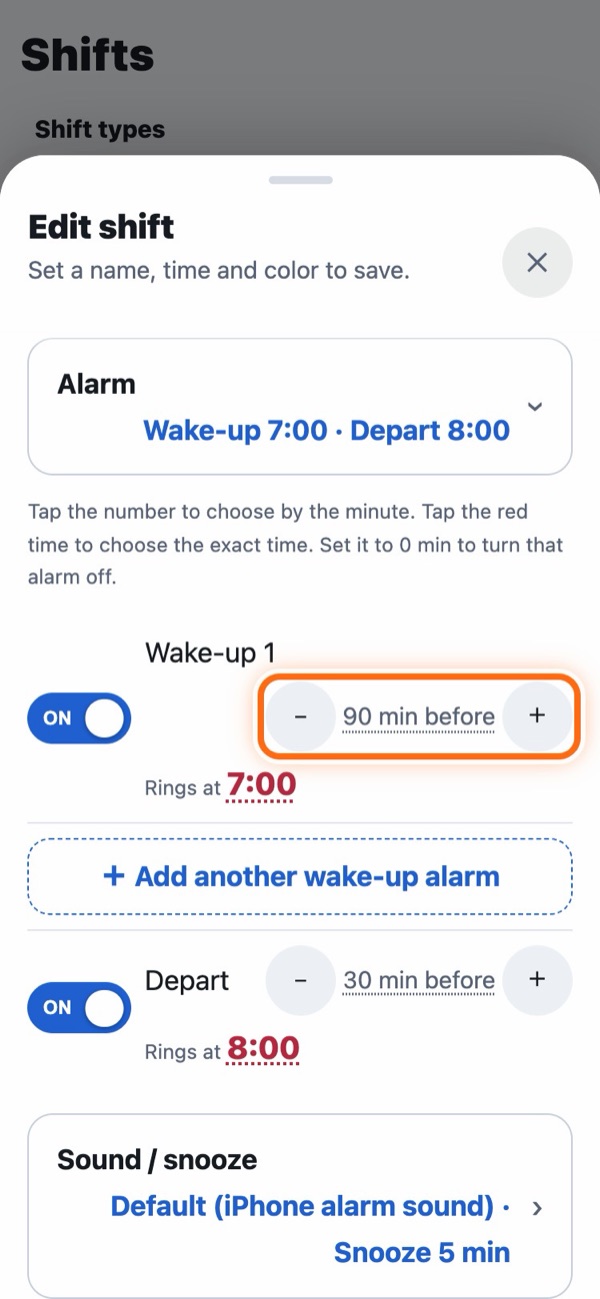
- The actual ring time is shown in red. Tap the red time to choose a time instead, like in the Clock app.
- Use the ON/OFF switch on the left to stop that alarm (the minutes are remembered).
- Up to 2 wake-up alarms and 1 leave-home alarm. Alarms you don't use appear as buttons such as + Add another wake-up alarm; tap one to add it. You can also open the shift screen by tapping the time on the right of the bar at the top of the calendar.
- On the free version, alarms aren't set automatically. Open a date to add them.
More (weekends, nights, silent mode, sound)
- Different times on Saturdays, or on Sundays & holidays: Open the Sat / Sun & holidays row and set “Saturday alarm time” or “Sunday & holiday alarm time” to Different.
- Night shifts: Shifts that start after midnight, where you wake up the evening before, are supported too.
- In silent mode (Android only): Under “In silent mode” in the “Sound / snooze” row, choose Ring (the default) or Vibrate only. iPhone alarms ring even in silent mode.
- Sound PRO: Choose a sound for each shift in the “Sound / snooze” row (5 Cyclam sounds, your phone's ringtones, a voice recording, your own sound files and more). For example, you can use a loud sound only before night shifts.
Imported voices and songs repeat until you stop them.
iPhone: Choose from “Record your voice”, “Choose from Music” or “Import from a file”. Songs and voices use the first 29 seconds. Apple Music streaming songs can't be used because of copy protection (songs you bought or imported from a CD can be used).
Android: Choose from “Record your voice” (up to 29 seconds) or importing a file. To use a song, import it as a file. Sound files (mp3, m4a, wav, etc.) can be up to 30 MB, and songs play to the end. - Shifts you don't want alarms for: A new shift starts with Wake-up alarm 1 turned on. For shifts that don't need alarms, use − to set every wake-up and leave-home “X min before” to 0 minutes (at 0 minutes it turns into a “+ Add … alarm” button).
Change one day, or add alarms yourself
- Skip one day: Open that day, open the “Alarm” row, and turn off the switch on the left of that alarm.
- Change the time for one day: Open that day and open the “Alarm” row to see “Alarms for this day only (min before shift start)”. Change it with − +. On days you change your start time, the alarms move with it.
- Change the sound or snooze for one day PRO: Open that day and tap Change for this day only in the “Sound / snooze” row.
- Sound on days off PRO: Open a day off and, in the “Sound / snooze” row, tap Change for this day only or Change the sound for all days off. In the Android app, the second one also lets you turn vibration off or on.
- Delete an alarm set by time: Open that day and tap Delete in the “Alarm” row. If it was a mistake, tap Undo, which appears just above.
- Add one yourself: Open that day, open the “Alarm” row, and turn on the switch on the left of that alarm. An alarm that has already rung shows “Done” on the left. To ring again on the same day, tap “Done” and choose a time before your shift starts to set it again. On the free version, you can add alarms up to 1 week ahead from today.
Check which alarms are set
The large card at the top of the Alarms tab is the next alarm to ring. Below it, upcoming alarms are listed by day. Check here before you go to sleep.
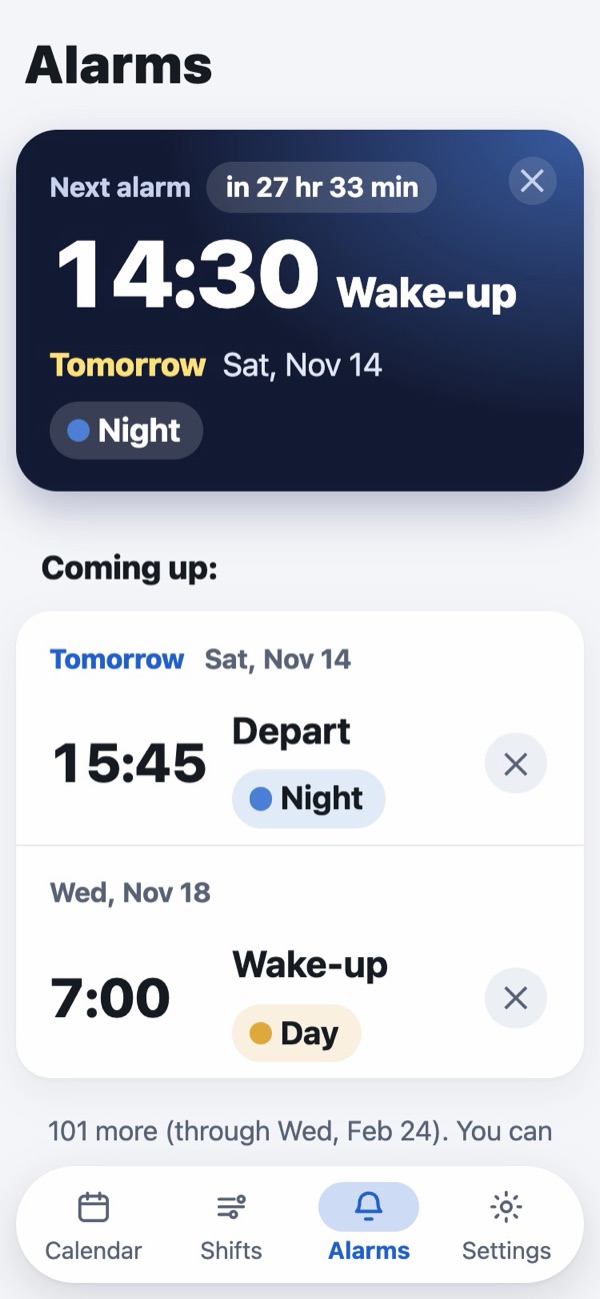
- Delete just one: Tap ✕ on the right. If it was a mistake, tap Undo, which appears just above.
- Put back alarms you removed: If some days still have their alarms removed, “Days with alarms removed: X” appears. Tap it to set them all again.
- Alarms that weren't stopped (iPhone): An alarm that didn't ring, or whose sound stopped after 15 minutes without being stopped, is cleared after a while and reported under “Alarms that weren't stopped” (close it with ✕). On iPhone, the sound stops after 15 minutes if the alarm isn't stopped. If notifications are allowed, you'll also get a notification. So that it rings even at the same time as an alarm on the iPhone itself (the Clock app), a Cyclam alarm rings 5 seconds after the exact time.
- Alarm settings (check these): If a permission is missing or a setting should be changed, it appears at the very top. Tap it and set each one. If the only ones left are optional (alarms ring without them), tap Leave as is (move down) to move them down. On Android, after alarms are set automatically, if some settings are still not done, the app tells you once: “X settings to set up for reliable alarms”.
Alarms at any time (trash day, etc.)
Set alarms for things unrelated to work, such as trash day or medicine. You can add up to 5. They're free to use.
- Open Alarms at any time at the bottom of the Alarms tab.
- Tap + Add alarm and choose a time.
- Tap Name, repeat & sound to set the details.
- Name: For example “Trash day”. It appears on the ringing screen and in the list.
- Weekday: Rings every week on the days you choose. If you choose none, it rings once and turns OFF.
- Which week of the month: Choose “2nd” and “4th” to ring only on the 2nd and 4th of that weekday in the month.
- Shift: Choose Only on these shifts or Not on these shifts. For example, ring only on day-shift days, or don't ring on night-shift days.
- How to alert: Ring as an alarm, Notification only or Memo only. Memo only doesn't ring; it's just a note.
- Sound PRO: If you don't choose one, it uses the “Days off” sound.
Repeating alarms are set up to 8 weeks ahead. Open the app to add later ones. In the list on the Alarms tab, tapping ✕ removes just that one time of a repeating alarm.
When your shifts are about to run out PRO
Alarms don't ring on days with no shift. As the last day of the shifts you entered gets closer, a notice bar appears above the calendar (from 14 days before; from 6 days before, the bar is red). If you allow notifications, you're also told by notification. Enter your shifts further ahead. If you won't use the app for a while, tap Hide (not using it for a while) on the bar that appears after your shifts run out.
Alarms are not guaranteed to ring. Depending on your phone's settings and battery state, they may not ring. Until you're used to the app, use it together with your usual alarm.
Everything to check is in Settings > “Other” > If alarms don't ring. Tap Ring in 1 min to test there and it rings once, 1 minute later. Turn off the screen, wait, and check that it rings and that you can stop it.
8. Phone calendar and widgets App only
“Calendar app” on the Shifts tab has two switches. Both ask for access to your calendar the first time, so please allow it.
Add to phone calendar automatically
Creates a separate calendar named “Cyclam” in your phone's calendar and puts your shifts in it. When you change your shifts, the calendar changes too. Your other calendars are not touched.
- Shifts that run past midnight, like night shifts, are added on the day they start (until 23:59 that day). The real times are written in the event notes.
- If you turn it off, the “Cyclam” calendar is deleted along with its events.
- On iPhone, this calendar may be created in iCloud or a similar account. If so, it also syncs to your other devices.
Show phone events in Cyclam
Shows events from your phone's calendar (including Google and iCloud events) on top of Cyclam's cells. It only reads them and never changes them.
- On days without a note, the event name appears in gray. If there are more events or a note on that day, a red “+” is added after it. Open the “Phone events” row on the date screen to see the times and names.
- When you turn it on, a list for choosing which calendars to show appears. Tap a row to switch between “Show” and “Hide”.
Home screen widgets PRO
| Calendar | Large. This month's shifts and notes. Today's date turns blue and its cell is outlined in blue. Important days get the same colored ring as in the app. On Android, if you make it short, it shows this week and next week. |
|---|---|
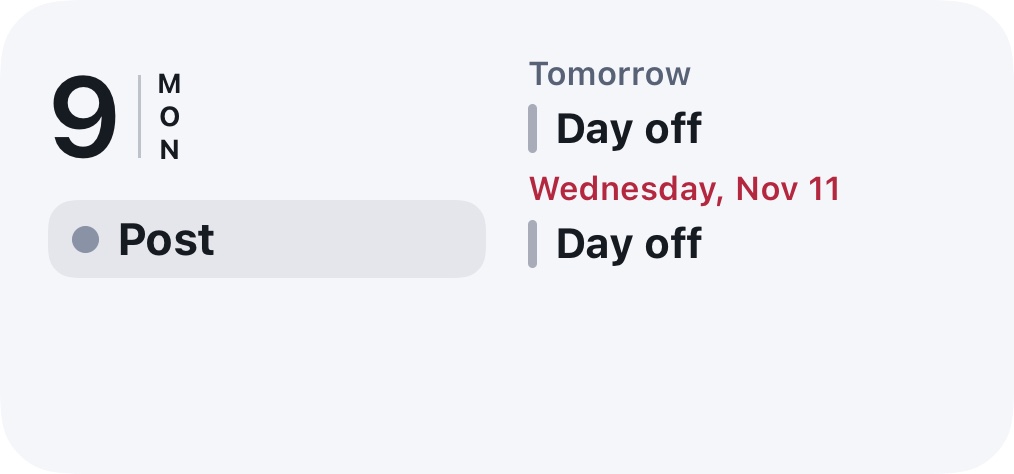
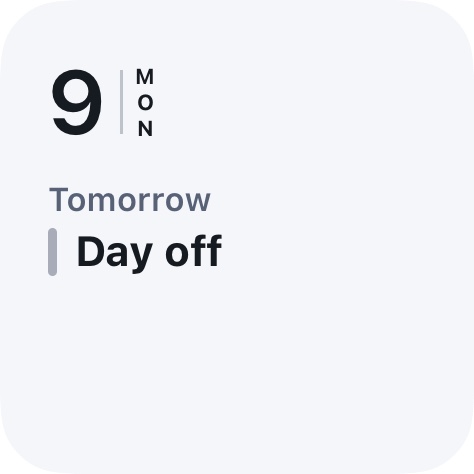
| Today & next shift | Medium: today's shift and events, plus the next few days. Small: today's date and your next shift. On Android, there's also a wide one with today and tomorrow side by side. |
| Lock screen | iPhone only. Your next shift and your wake-up and departure times. In the list it's called “Cyclam Next shift”. |
- How to add it (iPhone): Long-press an empty spot on the home screen → “Edit” → “Add Widget” → “Cyclam”. For the lock screen: long-press the lock screen → “Customize” → “Lock Screen” → the box under the time → “Cyclam”.
- How to add it (Android): Long-press an empty spot on the home screen → “Widgets” → “Cyclam”.
- Xiaomi (Redmi, POCO) phones: At first, the widget list shows only Xiaomi's own widgets (searching won't find it either). Tap in this order:
- Long-press an empty spot on the home screen and tap Widgets at the bottom.
- Under “Apps with multiple widgets” in the recommended section, tap App vault (on some models, “Android widgets”).
- Under “Cyclam” in the list, choose the size you want.
The Xiaomi screenshots below show the Japanese system screens. The labels on your phone may be worded a little differently.
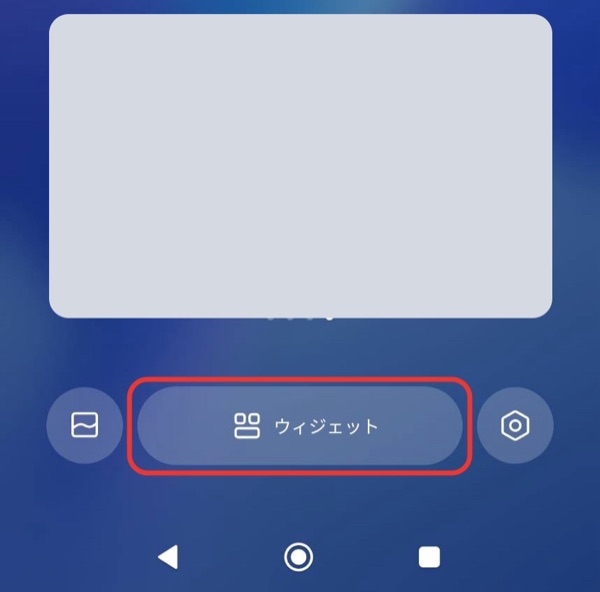
1. “Widgets” at the bottom 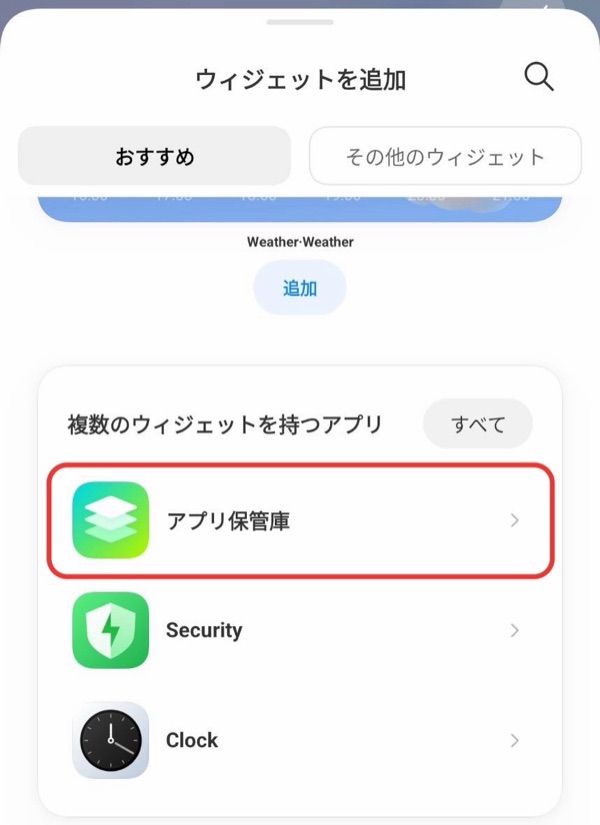
2. “App vault” 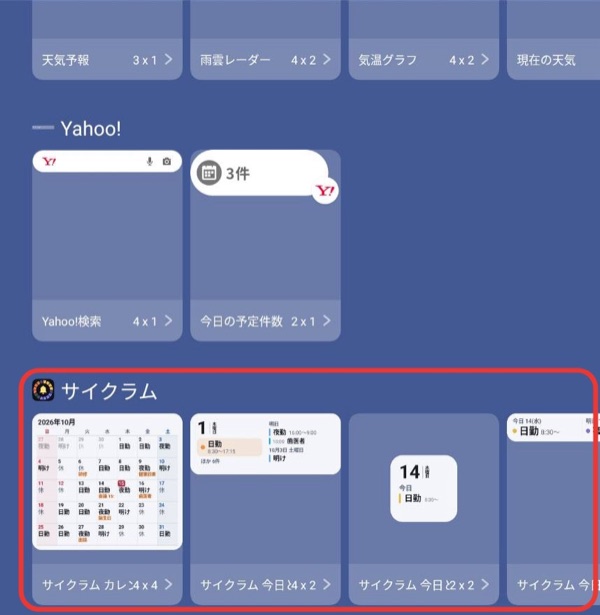
3. Choose from “Cyclam” - You can't change months in the widget. Tap it to open the app.
- To show events, turn on “Show phone events in Cyclam”.
- If a newly added widget looks black, open Cyclam once and wait a moment.
9. Share and back up
Send your shifts
With Send / copy shifts on the Shifts tab, you can send your shifts as text or as a calendar image (Send calendar as image) by messaging app or email. Your shifts are sent only when you send them yourself.
Show the screen (view only)
Turn on Show this screen (view only) to show only your shift pattern, with your next shift and leave balance hidden. You can hand your phone to someone without worrying that they'll change anything. To exit, tap Exit view at the top, then Exit and return to the owner's screen.
Back up (save a copy)
Everything you enter is saved on your phone. Save a copy in case you switch phones or something goes wrong.
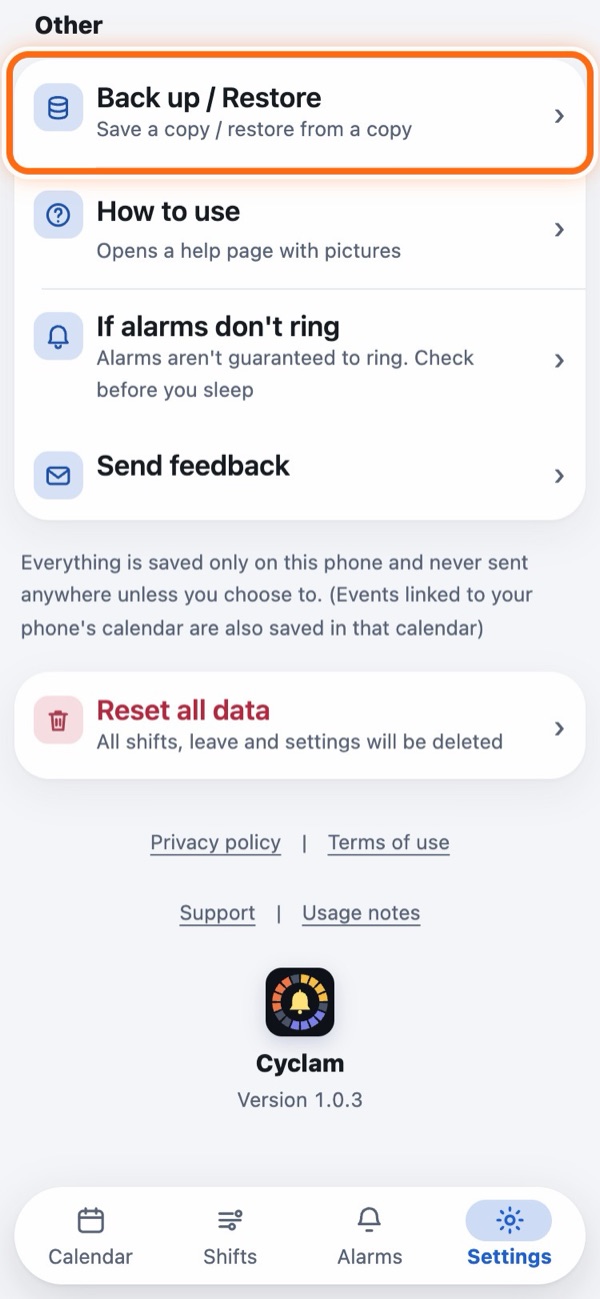
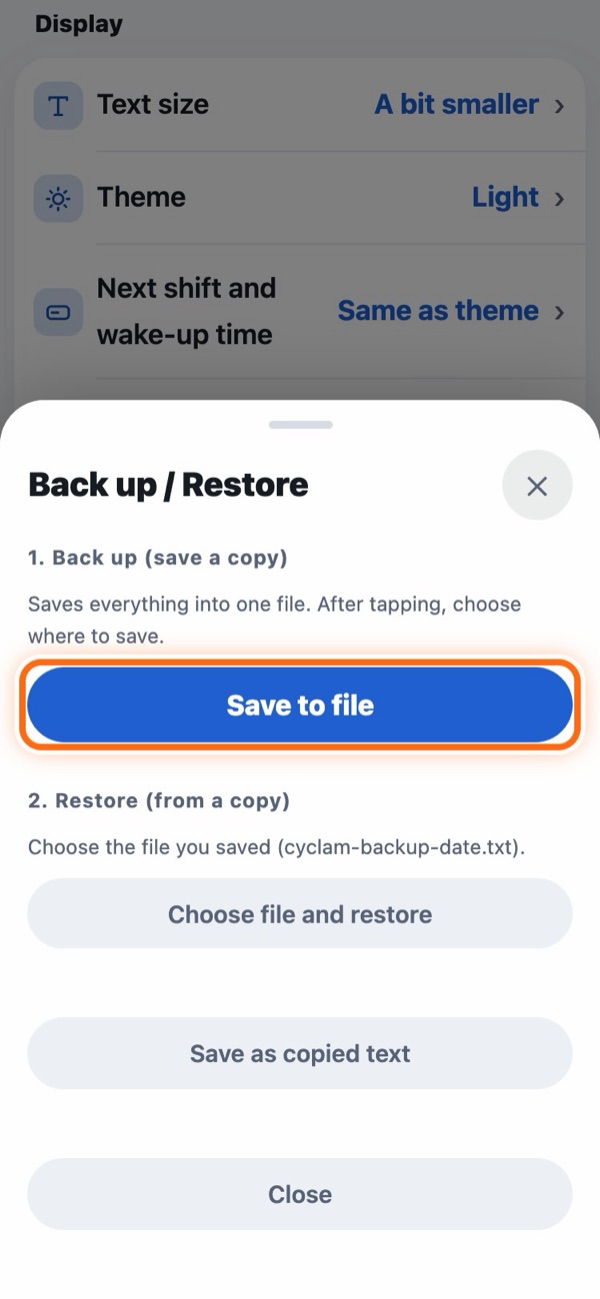
Choose where to save it (on iPhone, “Save to Files”; on Android, “Downloads”, Google Drive, etc.), and a file named cyclam-backup-date.txt is created. To restore, use Choose file and restore under “2. Restore (from a copy)” on the same screen and choose that file.
If you delete the app, everything you entered is deleted too. Always save a copy before deleting it.
Roster photos are not included in the backup file (see Roster photo).
10. Troubleshooting
Alarms don't ring or aren't set
- Check whether “Alarm settings (check these)” appears at the top of the Alarms tab.
- Check on the calendar that a shift is entered for that day.
- Before you start the trial and after it ends, alarms aren't set automatically (see Free and PRO).
- For naps and lunch breaks, check in “Break alarms” under Stations and breaks that the switch for that break is on.
- Also check Settings > “Other” > If alarms don't ring.
- On Android OPPO, realme and OnePlus phones, battery settings are in a different place. Go to “App info” > “Battery usage” and turn on “Allow background activity” and “Allow auto launch”.
- On Samsung Galaxy phones, Android may put Cyclam to sleep to save battery. Go to “Settings” > “Battery” (on older models, “Battery and device care” > “Battery”) > “Background usage limits” > “Never sleeping apps”, tap “+”, select Cyclam and tap “Add”. The labels may differ slightly by model and software version.
Cyclam doesn't appear in the widget list
- If you just installed Cyclam, open it once, then check the list again.
- On Xiaomi (Redmi, POCO) phones, it's in the widget list under “Apps with multiple widgets” → “App vault” (on some models, “Android widgets”) (see Home screen widgets for steps with pictures).
Switching phones
On your old phone, create a backup file, send it to your new phone by email, cloud drive or similar, and choose it under “2. Restore (from a copy)” on your new phone. You can move between iPhone and Android too. Roster photos aren't included in the backup, so save them to Photos and add them again. Get PRO back with Bought before? Restore purchase on the purchase screen (when you use the same store account).
On your new phone, be sure to open Cyclam once. Alarms aren't set until you do. If you're asked for permissions, allow them. Auto alarms are set again at that time. Check alarms you added yourself on the Alarms tab, and add them again if they're missing.
Change how the screen looks
Change it in Settings > “Display”. Each item is folded into one row like “Name current value ›” and opens when you tap it (important days, how shifts and days off look, and cell marks are in “Advanced display settings” inside it).
- Text size: 6 sizes.
- Theme: Auto, Light, Dark.
- Next shift and wake-up time: The color of the bar at the top of the calendar.
- Week starts on: Sunday or Monday (widgets use the same order).
- Holidays: Which public holidays are shown. Auto uses your phone's region. You can also choose a country here.
- Advanced display settings (things you usually don't need to change):
- Important day notices: How many days ahead to show a bar (and fill in the date) for important days. The paid leave grant date is shown on the day only. Choose from Don't notify, On the day only, … up to From 30 days before (default: From 7 days before).
- Closed notices: After you close an important-day bar with ✕, whether to show it again the next day (the default is not to show it. A closed notice doesn't show again until that day has passed).
- Mark important days: Whether to put a colored ring around important dates and fill it in as the day gets closer (the paid leave grant date already has its green outline, so it doesn't get a ring).
- Make important days glow: Whether a glow in that color runs across important days' cells every 5 seconds (only for today and later. The default is Off).
- How shifts and days off look, Cell marks and colors: See How shifts and days off look, cell marks and colors.
My paid leave balance doesn't match
- Check that you're looking at this period in the Leave section of Settings (when you're looking at last period or next period, the dates turn red and Back to this period appears).
- Check that your grant date matches your workplace.
- Leave you've added to the calendar is already subtracted, including leave on future dates.
I want to start over
To clear only from a certain day onward, use Clear from a date onward. To clear everything, use Settings > “Other” > Reset all data (shifts, leave and settings are deleted; text size and theme are kept). Right after deleting, you can get it back with Undo in the bar at the top.
Can I use alarms in the web version?
No. A browser can't control your phone's alarms. Use alarms in the iPhone or Android app.
Contact
Settings > “Other” > Send feedback, or email cyclam.support@gmail.com.
Back to contents